another lazy Sunday morning session. + BTS Video.

beauty, Behind the scenes Video, location, Nude

hi there,

please enjoy with me these results from another ‘lazy Sunday morning’ session I did with Alisson this time. Below you’ll find a link to the behind the scenes video of this particular session.


you wanna see how the session looks like, behind the scenes:

check it out here, you’ll need a Youtube account, as it is 18+ and it won’t play outside Youtube:


the beauty of available light – workshop results

location, Nude, Workshop

Hi there fans and followers,

I’m pleased to be able to show you some results from the individual ‘available light – art nudes’ workshops I gave last summer. It seems a long time ago already. …

The location proved very well suited for a range of light situations and with some creativity we managed to turn a ‘standard’ bed and breakfast location into a perfect photo location.

Model of the day, the always beautiful and elegant Riona Neve (http://rionaneve.com/)

Remember you can be part of this too, If you want upgrade your ‘available light’ portrait skills,  please drop me a line trough this page 

In the coming weeks I’ll post some images from the second individual workshop day, with Violaine as my model.

all the best,

Ludwig

New Studio – first results

Nude, projects, studio, studio light setup, Tips and Tricks, Uncategorized

I have finally decided to create a studio space in an old factory building that is situated in my own garden. The building is not really in good shape, but it is more or less weather-proof and this should be enough to keep me running for the next couple of years.

What I did: Within the volume of the first floor (approximately 8 x 12 meters) I created a smaller volume, approx 4.5 x 8 meters that I have completely ‘re-finished’. I got rid of the roller shutters in the windows, I re-plastered the brick walls with natural clay, I put up a new wall in timber structure and re-painted the whole thing. I just finished a large double barn door this week. This ensures the poly-valence of the space. In case I need to bring in large items, that’s perfectly possible.

I wanted to keep the space as simple as possible, and I divided the long side in two halves, a dark side and a bright side. The dark side is handy if you want to have full control over your light, with virtually no light spill off the walls/ceiling. The bright half is interesting whenever you are looking for fill light on your subject.

There’s still a lot to be done, but last week I could do a first shoot in this new space, and I’m very glad my client Sofie has approved to use some of the images in this blog post. The session took about 3 hours and  I’m sure you’ll be as impressed with these results as I was. Sofie never posed before, she’s a natural! Thank you Sofie for your enthusiasm and your confidence!

Some of the images were taken with studio light (studio flash) and others were taken with available light only. All were taken with the help of ambient music 🙂

First a series with a single flash head, standard reflector with 20° grid aimed at a white wall. The grid limits the width of the light beam and creates a nice falloff on the wall. It creates a rather hard shadow. The flash light overrules any available light there might be in the space.

I found them to be very fashionable.

We continued with the same setup, single flash but I’m using another wall as background.

Below the white wall reacts as a perfect reflector for the models face. The shadow gets harder the closer the model comes to the wall.

As I have a dark side and a white side, I have one sharp black/white edge. I used a styrofoam board as a second white surface behind the model. Single flash with 100 cm octa softbox.

From the garden shed I recovered this old work bench, cleaned it up and it will now serve a second life as studio prop. Full of character, a ton of possibilities and well contrasting with the female curves. Two flash heads left and right, small square softbox 66 cm each. By removing the subject from the back wall I can keep the background perfectly black.

Another setting at the dark side, a single softbox slightly higher than the model, model laying down on a black trunk. Using the light as a feather light over the body. Styrofoam panels on the opposite site give just a hint of volume in the shadow areas.

And then at last, over to the bright side again, using available light only, and with the help of the white wall for fill light I get a beautiful overall light.

And last but not least, did we have fun? Yes, of course, we had a lot of fun.

Sofie wrote me in a message afterwards ‘Ludwig, thank you for making this such a wonderful experience … ‘ . Well, I guess that’s what this is all about. Making women feel great about their body, giving them the space they need to build self-confidence and then, as a privileged witness capture this beautiful moment in images.

Thank you for reading this blog post, If you are a photographer and interested in building your own space, I hope you’ve learnt something. If you are thinking about booking a shoot session yourself but you are not really sure what to expect, here you have it. In an afternoon’s time, you can have yourself depicted in beautiful, sensual, intimate images and never forget that moment!


Workshop Lingerie with available light – results

beauty, location, personal tips & tricks, Tips and Tricks, Workshop

Same as last week, you’re getting spoiled, aren’t you 🙂

Some results I managed to capture during my own workshop Model/lingerie photography with available light. Models during this workshop: Riona Neve and Sahri Nimi – behind the scenes video at the bottom of this post.

All images are available as a fine art print, inquiries please send me an email.

Hidden gems 2019, workshop Lingerie with available light

behind the scenes video on my Youtube Channel

thanks for watching, make sure to come by next week!

Ludwig

Workshop Portrait with available light – results

beauty, Behind the scenes Video, location, personal tips & tricks, Uncategorized, Workshop

As I do conduct the workshop myself, I do not have very much time to make images myself, it is my absolute desire to help the participant as much as possible.

Nevertheless, I managed to make some good shots in between tuition, and here they are, in the hidden gems 2019 category, images from the portrait workshop.

Remember, all images taken with available light only, on the day of the workshop.

On the bottom of the page I’ll re-link the youtube video I made from this interesting day, go check it out!


behind the scenes on Youtube

thanks for stopping by, see you next Sunday!

Ludwig

The ‘I am’ video finally released

Behind the scenes Video, location, Nude, Uncategorized

As a registered 18+ Youtube user you can see the video on my Youtube channel, but for your convenience I’ll put it here trough Vimeo:

It was a fun day, I didn’t really adapt my shooting to the cameraman, but still, there was some influence at least. I’m quite pleased with the results of this day, look for yourself, you’ll probably recognise some of the scenes from the video. The film shots are black framed.

Shot on film: (Rolleiflex Tlr 3.5 Planar on Ilford Film)


and then one more, as a tribute to the cameraman Franswa. You can see me make this shot at 4.52 in the film!!


thanks for looking, If you want to make sure to see everything I publish, you might consider subscribing to my blog. You can do this on the bottom of the welcome page, click the + sign.


Julia

beauty, location, personal tips & tricks, portrait

I have never met her before, except on the internet. She’s all around the internet, google her and you’ll know what I mean: Julia Yaroshenko.

We worked together a couple of weeks ago, I rent an Airbnb in Brussels and we did an afternoon session. A first image as a little preview.

This weekend I’m giving the first two of my workshops, about working with available light in portrait/boudoir/art-nude photography. The above portrait was created in a small bedroom with only one window. Not everything is possible, but a lot can be done with a little creativity and bounced light. If you’re interested, there are still two spots available for next Saturday (01/06), tomorrows workshop is fully booked.

Ludwig

Studio Light setup

studio, studio light setup, Tips and Tricks, Uncategorized

a long time ago I made some studio setup diagrams for this blog, … time to make a new one. First the image, it dates from a while ago, last fall I invited two friends to do some studio work. I rarely use my studio equipment for light, but in winter times it can be handy to have an alternative to available light sometimes.

the image:

I wanted Steven to get some sort of gangster look, cool looking, hood, sunglasses …

I wanted a soft light and deep shadows under the hood, so I went for some sort of symmetrical light setup, using two studio flashes with 60x60cm softboxes, and two large reflector panels to even enlarge the light source.

The setup:

it was only a matter of finding the good ‘depth’ position of the model, to create just enough light on the face, and keep the light only on the front.

another one without the hood:


thanks for watching, come again soon,

Ludwig

Art-Nude week workshop announced

location, Nude, Workshop

still working on my workshop program for this summer, and I have the honor to announce an exclusive Art-Nude 4 day workshop on a unique location:

Art-Nude Week

Together with 2 professional models, I will guide you through the entire process of doing art-nude photography. From the location scouting, over measuring light, viewing your composition, working with and guiding models up to images selection and post-processing. A condensed all-in-one workshop for the enthusiast photographer.

Who is this workshop meant for: You are an enthusiast hobbyist and you are looking to upgrade your skills. You like to work with people in your photography, and you enjoy the female subject. You always wanted to try sensual art-nude in your photography but never found a way to get started. You want to taste the privilege of working with professional models, under controlled and safe circumstances. You fancy a nice castle and park as a shooting environment and you prefer the looks of natural light. If your answer is yes to the majority of these allegations, then this is meant for YOU!

What will be the setting? The setting will be a splendid privately owned castle near Tournai (Belgium) with surrounding green areas and annex buildings. The entire location (except a small private area in the castle) is available for shooting. An ideal place to work at ease and enjoy a vast amount of photography possibilities. Study the light and work with models. Talking about models, I will have 2 professional art-nude models present for three days. (one extra model may be added if the number of participants exceeds 5. They are easy to work with and know a lot about posing, if you are not so familiar with that part, they will guide you. The number of photographers is kept very limited, to allow every photographer individual time with the models.

The location for the workshop

If you are interested in this workshop or one of the other workshops: CLICK HERE

SUMMER 2019 WORKSHOPS Announced

location, Nude, personal tips & tricks, Tips and Tricks

hi there, (Nederlandse tekst hieronder)

thanks for being still here, after my little rant in the previous post. …

I have the honour to announce a first-ever event in my photography career: I will give tuition in three one-day workshops this spring/summer, about working with available light only, and in the different subjects I tackle: Glamour portraits, ladies in fine lingerie, art-nude photographs.

Who are these workshops meant for: You are an enthusiast hobbyist and you are looking to upgrade your skills. You like to work with people in your photography, and you enjoy the female subject. You always wanted to try the nude in your photography but never found a way to get started. You prefer the look of natural light or you are not able and not willing to invest in a complete studio, and you want to learn more about working with available light only, then these are meant for YOU!

What will be the setting? The setting will be my own studio and annex rooms. I occupy a studio space in Ronse (Belgium) and this studio is part of a larger complex containing all empty rooms. An ideal place to study the light and work at ease with models. Talking about models, I will have 2 professional models present at each workshop. They are easy to work with and know a lot about posing, if you are not so familiar with that part, they will guide you. The number of photographers is kept very limited, to allow every photographer individual time with the models.

If you are interested in one or more workshops: CLICK HERE

Look at the Light

Soft and Silky

Skin and Curves

beste bezoeker,

Bedankt om hier nog te komen zien na mijn korte klaagzang in de vorige post. …

Ik heb de eer en het genoegen u in première mijn zomer-workshop programma voor te stellen: Drie ééndaagse workshops rond het werken met beschikbaar licht, opgedeeld in de drie onderwerpen die ik zelf in mijn fotografie heb: Glamour portretten, vrouwen in fijne lingerie, en kunstig naakt.

Voor wie zijn deze workshops bedoeld? Je bent een enthousiaste hobbyist en je wil graag je kennis bijspijkeren. Je hebt altijd al zin gehad om eens met naaktfotografie aan de slag te gaan, maar nooit echt de stap durven zetten om te starten. Je houdt er van om mensen te fotograferen, en je hebt een bijzondere voorkeur voor dames voor je lens. Je verkiest het om met natuurlijk licht te werken, of je bent niet in de mogelijkheid om een complete studio in te richten, dus wil je het maximum halen uit werken met aanwezig licht. Dan is deze workshop voor JOU bedoeld!

Hoe ziet de setting van de workshop er uit? De workshop gaat door in m’n eigen studio in Ronse. Hierin bekijken we wat verschillende setups, de manier van licht meten, hoe omgaan met je model, enzovoort, … na de middag is een groter deel van het gebouw beschikbaar om op zoek te gaan naar ideaal licht, waar je de modellen kan fotograferen. Over modellen gesproken, voor elke workshop zullen 2 professionele modellen aanwezig zijn, die zelf heel goed weten hoe ze horen te poseren. Dus als jij met dit deel niet echt vertrouwd bent, zij helpen je er wel door. Het aantal deelnemers is heel beperkt gehouden om elke fotograaf individuele tijd te geven met elk model.

Als je interesse hebt in het volgen van één of meer workshops, KLIK DAN HIER

freestyle shooting in the studio

erotic, Nude, studio light setup, Tips and Tricks

Two weeks ago I did a model call for a freestyle shooting session in the studio, just to try out some light setups and to not forget about working with studio strobes. Remember, 90% of my work is purely based on available light.

I had two models coming over, one male that I never worked with (lets call him Steven) , one female that I had regular cooperations with since about two years, lets call her Charisse 😉

Steven never modelled, he said the day before he came to me. Ok great, I told him, that’s cool, so we can find out if newbies can lead to great results. And he did, 200% he did. See for yourself:


the images above are all made with two studio strobes.

Then that same morning, after this first session I had Charisse arriving at the train station for pickup, and we started shooting early in the afternoon. A totally different setup, with both nude and non-nude work, of which I will show you only a small teaser for now. We did a lot of different things, with a lot of good results, so make sure you come back again soon.


thank you for stopping by, visitor of this blog. Consider subscribing if you like what you see. Come back again soon.

thank you Steven and Charisse, for being my interim models for the day, for your patience and your trust!!

Ludwig


ps. I: soon I will be on Patreon, where you can support my activities and get extra behind the scenes video’s, how to tips, and other benefits! Watch out!

ps. II: video: me cleaning the studio afterwards, here you can see more or less all I have in the studio. Limited stuff, a lot of creativity.

DANCE ! – shooting some dance movements in the studio

personal tips & tricks, photo gear, Tips and Tricks

Hi there,

last weekend I had a meetup with Lisa and her friend, both dancers, she’s more into the classic dance, he’s more of a break-dancer.

I will show you some images, but I would also love to talk about the technique that I used to get to these.

first some images:

nice hey 🙂

thanks to both athletes, they had a good exercise session.

How is it done?

We wanted both the movement, and a good image of the static phase. I rarely work with flash but here it is absolutely needed.

this is the setup: I have one studio flash with large softbox on the left of the scene, providing the main illumination of the stationary phase. (flash) I have a second studioflash at the right side of the scene, providing a rim light at the moment of flash. I have a third flash on the camera, Canon does not allow to fire remote flashes at the end of the shutter time without a dedicated Canon flash. This is a Canon 580EX II and is used in manual settings at 1/64th of full power. It is merely used as a ‘master’ or ‘trigger’ for the studio flashes, synchronising on the second curtain, this means just before the shutter closes. I have available light from the right side, just behind me. (outside light, strong enough to make the motion trails during shutter time, but not to strong to overly brighten the environment. This is actually better done with a strong continuous light like a 500W halogen spot, but I don’t have one.)

The camera is set to bulb, on a tripod, and with a cable release. This is all part of a relatively simple preparation phase. 😉

Now comes the tricky part, how to get just the good shot? Simple: You activate the shutter time by pressing and holding the shutter button, let the movement roll and close the shutter when the movement has finished. Simple? Yeah, think again. Some movements only take a blink of an eye before they are gone, finished, over and out. For some movements you need to have the flash triggered exactly at the end of the movement, and you have to be aware that there’s a little ‘delay’ between pressing the button and the actual start of the shutter time. My best images came with shutter times between 1/5th and 2/5th of a second!

to illustrate the process of the Bulb-shutter time:

Easy, isn’t it. Well, both dancers have at least 20 times repeated every move, before I could define the right starting moment, and the right moment to stop. Then 10 more times to get the one lucky shot we needed. Maybe I’m getting old, or slow in reactions. 🙂

Make sure to have your models wear dark clothing, otherwise you’ll get a lot of messy blotches from the movement phase. You want them to wear light coloured clothing at hand or feet, unfortunately they did not have white gloves. The brighter, the more visible the movement trail will be.


some mistakes:

no movement visible – too little continuous light, only the flash fixes the image

cable release gets stuck, way too long exposure

start too early, left foot clearly visible in starting point, stop also a little too late, left foot is coming down already.

start and stop too late, left foot is almost up at start, and way over the best position at stop.

thanks for reading, it was fun to do, and I learned a lot about dancing

cheers, come back again soon.


Ludwig


new behind the scenes video – Charisse black lingerie shoot

beauty, Behind the scenes Video, Nude

Hi there,

I published a new video to my Vimeo and Youtube channel today, you can see it here:

or here:

this is a condensed summary of a 45 minutes session of the shoot day I did with Charisse, you can figure out some of the light situations I make, see which poses get it to the final selection of images, etcetera. Learn by looking 🙂

for your info, all images were shot at f1.6, ISO100, Shutter speed 1/80 or 1/100s.


you can find more details about the reflector panels I use ‘by clicking here’

thanks for watching, if you liked the video, you might as well give it a thumbs up or subscribe to my channel(s)

thanks,

Ludwig

finding my way about in the new studio

beauty, Nude, people, personal tips & tricks, Uncategorized

I’ts been about a month that I have the new studio space available, it took me a couple of days to get the walls freshened up (two coats of paint) and a couple of weeks before I got some furniture and props ready and moved in, but I’m about to call it ‘ready’ for work.

I think it probably never be  a steady setup, because I want to keep some variation in my images, and variation will probably mean that I will bring in some new stuff from time to time and get rid of some ‘used’ furniture in the same pace.

Some observations so far just in case you think  about setting up your own studio space:

• I have windows (large) only on one side of the room. Not easy to work with, so get yourself some large reflectors to bring some light back from the non-window side of the room. I use styrofoam boards 120x180cm, painted black on one side.

• The wooden floor gives me a particular white balance in the space, some warm tone that is not easy to get right all the time.

• Too much light will kill you, or at least will often create overly bright images. I love to work with light and shadow equally, sometimes even more shadow than light. So I bought a large theatre cloth (6x3m) to cover up 2/3 of the windows when needed. I use additional styrofoam boards if needed to cover up even more window area.

• The space has sun-screens, I didn’t even notice when I agreed to rent it. These are great to work with when there’s direct sun falling in. The screens are fine woven, so they create no patterns, and they lower the light level not too much. They help evening out the hard contrasts in sunny situations. They are neutral in color. Perfect!

• The wooden parquet is kind of slippery, very good for moving around mattresses and large carpets without too much of an effort. For furniture I have a wheeled board for easy moving.

• The ceiling is at 2.90m, that is an absolute minimum. I have some curtain rails hanging up, they are kind of permanent, and sometimes they are hindering my viewing angles.

• I have an adjacent stock room, where I can move all unnecessary items (flash lights and their tripods when I don’t need them, drinks, clothing, background system, paint, cleaning materials, … Perfect again!

• I have brought in a large trunk (some kind of monastery huge heavy dark wood piece) that I use for quick storage nearby. It makes your stored stuff invisible, it is useful as a decor piece, there’s always something you might need in a minute, it’s there.

some images taken in the new studio:

2 white walls, a black wall, a wall with plenty of windows, and some creativity …

more to come,


best,

Ludwig

about paintings, erotica and sensorship

beauty, erotic, Nude, personal tips & tricks, Tips and Tricks

John William Waterhouse’s painting ‘Hylas and the nymphs’ dating from 1896, was recently removed from the Manchester Art Gallery’s walls in order to “prompt conversations about how we display and interpret artworks in Manchester’s public collection” …

further in the press release about the event, I could read: ” … but some of his paintings leave people uncomfortable and he has been accused of being one step away from a pornographer.”

Similarly, a request for removal was filed to the Metropolitan Museum of Art in New York, about the image “Thérèse dreaming” by the Polish French painter Balthasar Klossowski de Rosa, also known as Balthus. The request was backed by a 8000 signatures petition.

Can one judge an artwork that has been made about a century ago, using ethical norms (of some of us) of current day?

These events leave me a bit bedazzled and wondering, are we not tipping the balance over here, losing a genuine and healthy view on sexuality, sensuality, erotica and that unstoppable power that has been given to us and that bring men an women together?

As if we could exist without it?

Is it not the puritan regulations that have led to numerous sex-related scandals both in religious as in family context?

I am, as a photographer working with young women, very careful when it comes to being respectful to women, how I treat them during a shooting session, how I care about their photographs being exposed to a wider audience, and the possible reactions of relatives, friends or the wider context.

I am very supportive to the #metoo movement, as I have a couple of close (women)friends that have suffered inappropriate male behaviour, fighting the psychical consequences on a daily basis …

… but I think men and women should not fight each other, on the contrary … we can get a long way if we are mutually respectful and try to understand each other in our differences and similarities.

In this way I think sensuality, erotica and sexuality is not only an enrichment  to our lives, but a (literally) bare necessity for humankind, and in the same understanding, their figurative counterparts a culturally acceptable art form.


“This love of beauty is taste.

Others have the same love in such excess, that,

not content with admiring,

they seek to embody it in new forms.

The creation of beauty is art.”

Ralph Waldo Emerson


Film ‘scanning’ with the DSLR camera

Analog, Lightroom, personal tips & tricks, photo gear, Tips and Tricks

Ok, something I wanted to do for a long time:

On some fora, people have been asking how I scan my negatives, actually I’ve quit scanning, and digitise my 6×6 negatives with the Canon 5Ds high resolution camera, and a Canon 100mm Macro lens. For me it is quicker than scanning, I get a RAW negative file to work with, and I had all gear I needed for building a simple setup.

I have been looking for a new scanner for a while, genre Epson V800, but found them to be a little too expensive for my taste and limited use. I already had this Canon 5Ds camera, and I had a Macro lens, so I wanted to give it a try digitising with the camera in stead. I’ve built this setup to do so, (actually writing this blog post has inspired me to make it even better) …

see images below …

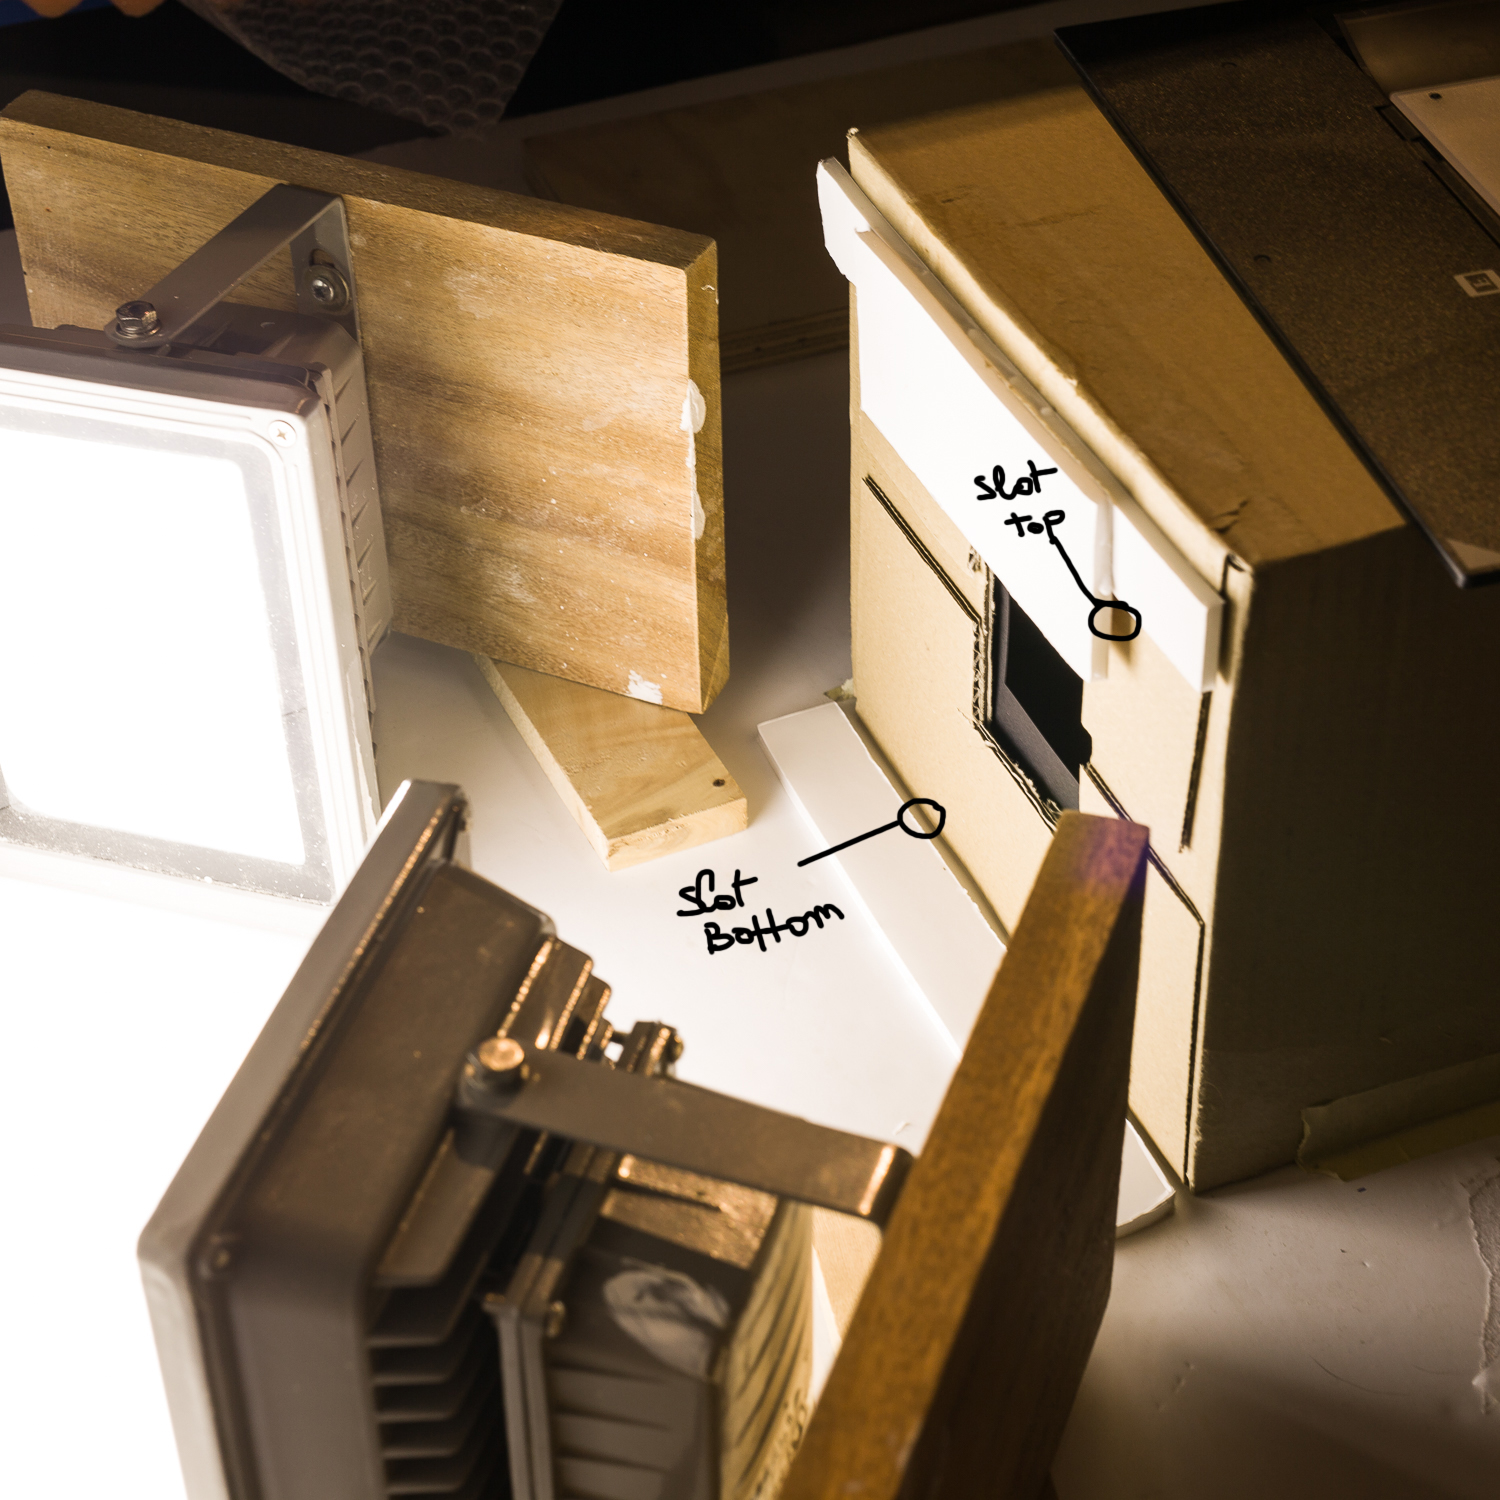
• I have two lamps (generic building LED lamps from a DIY store) that I point to the back, where I have a white foam board installed. I don’t care about the white balance because I work with black and white film, so I get rid of all colour anyway.

• At a relatively small distance (30cm – 1 foot) I have a cardboard box, fixed to a base board (same white foam board, cardboard box taped to it), with a hole in the back end, a little bigger than the negatives I am working with. On the inside of the box, I have put a black paper, with a square cut hole in it, to better fit the actual size of the negatives. The front side of the cardboard box is open, and takes the camera.

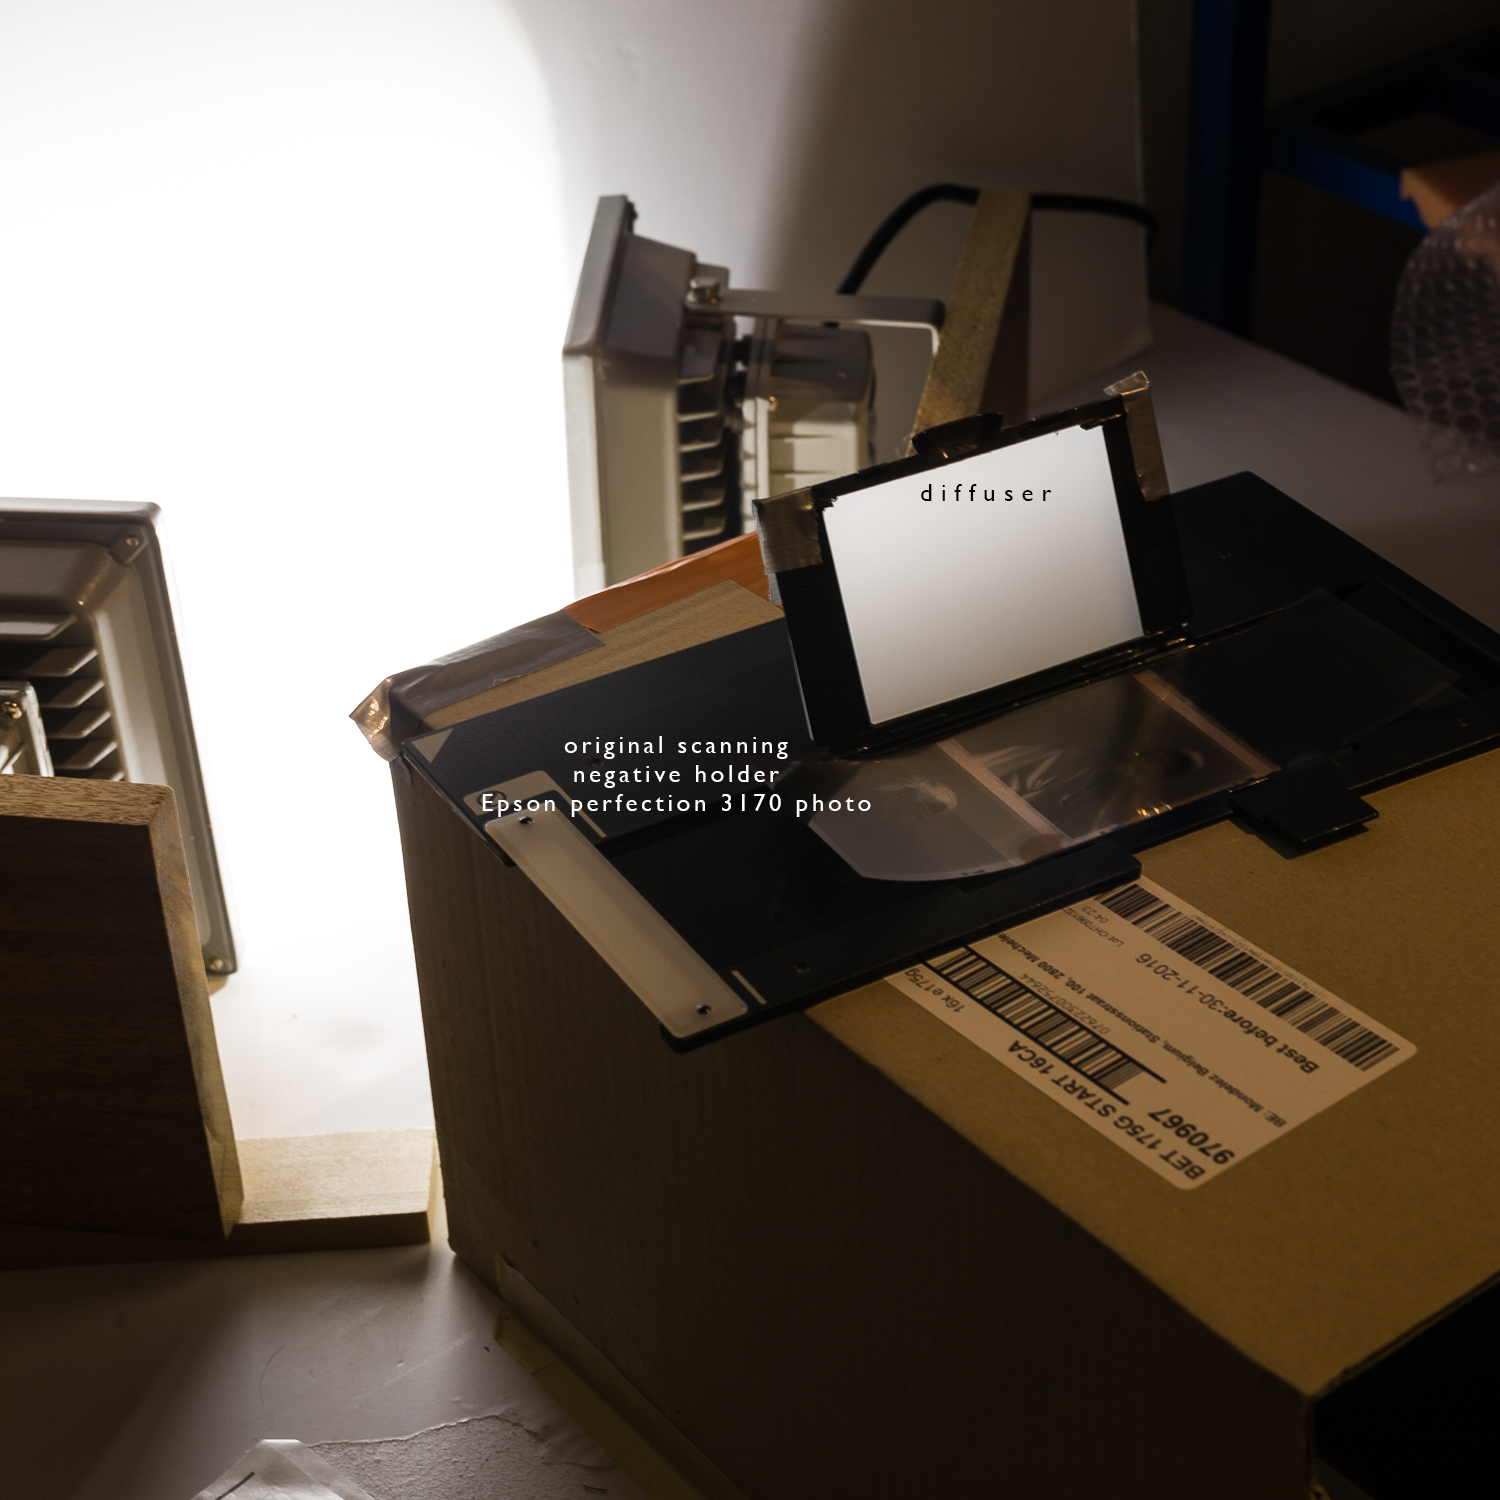
• I use a negative holder from an old scanner, but I cut the film frame a tad wider, to be able to see the negative’s edges all around. I kept the original diffusor window.

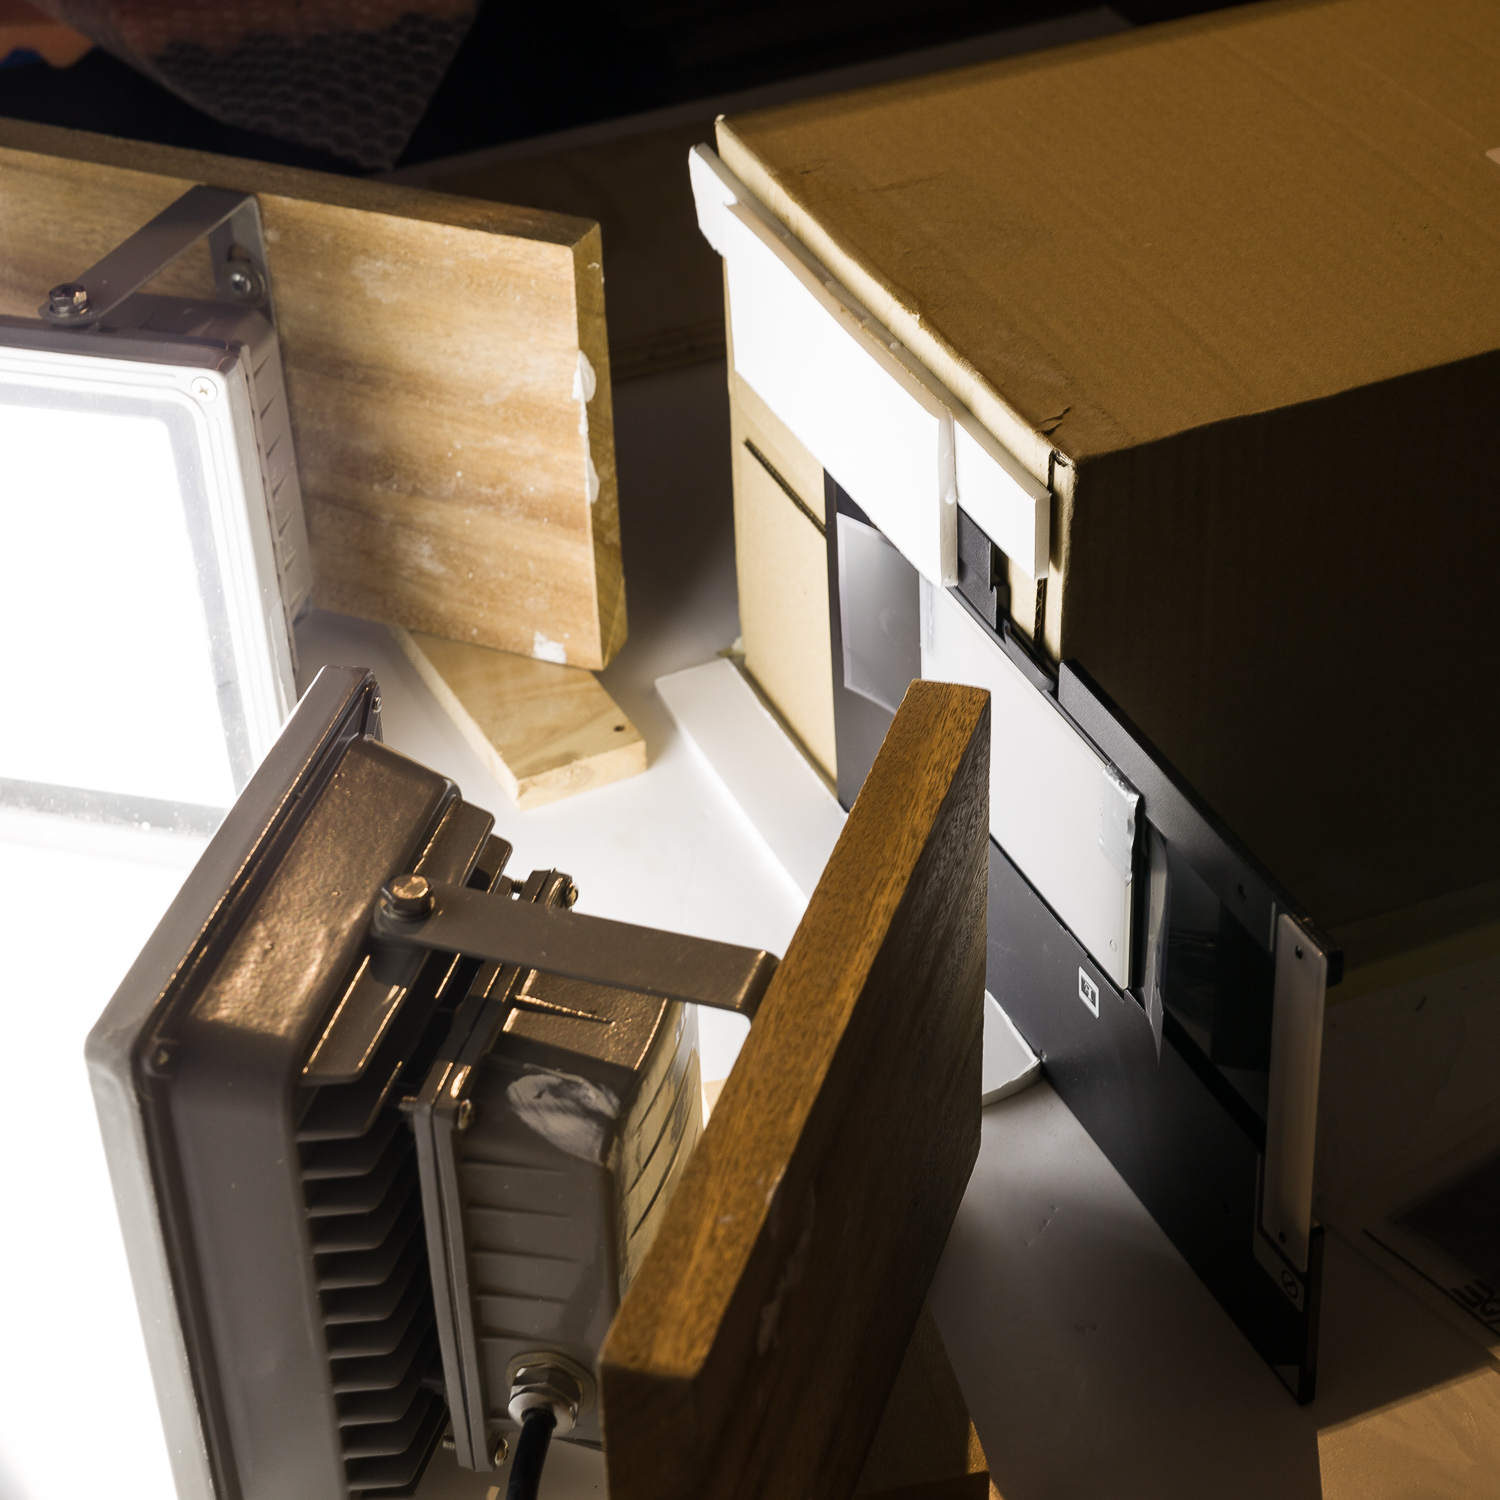
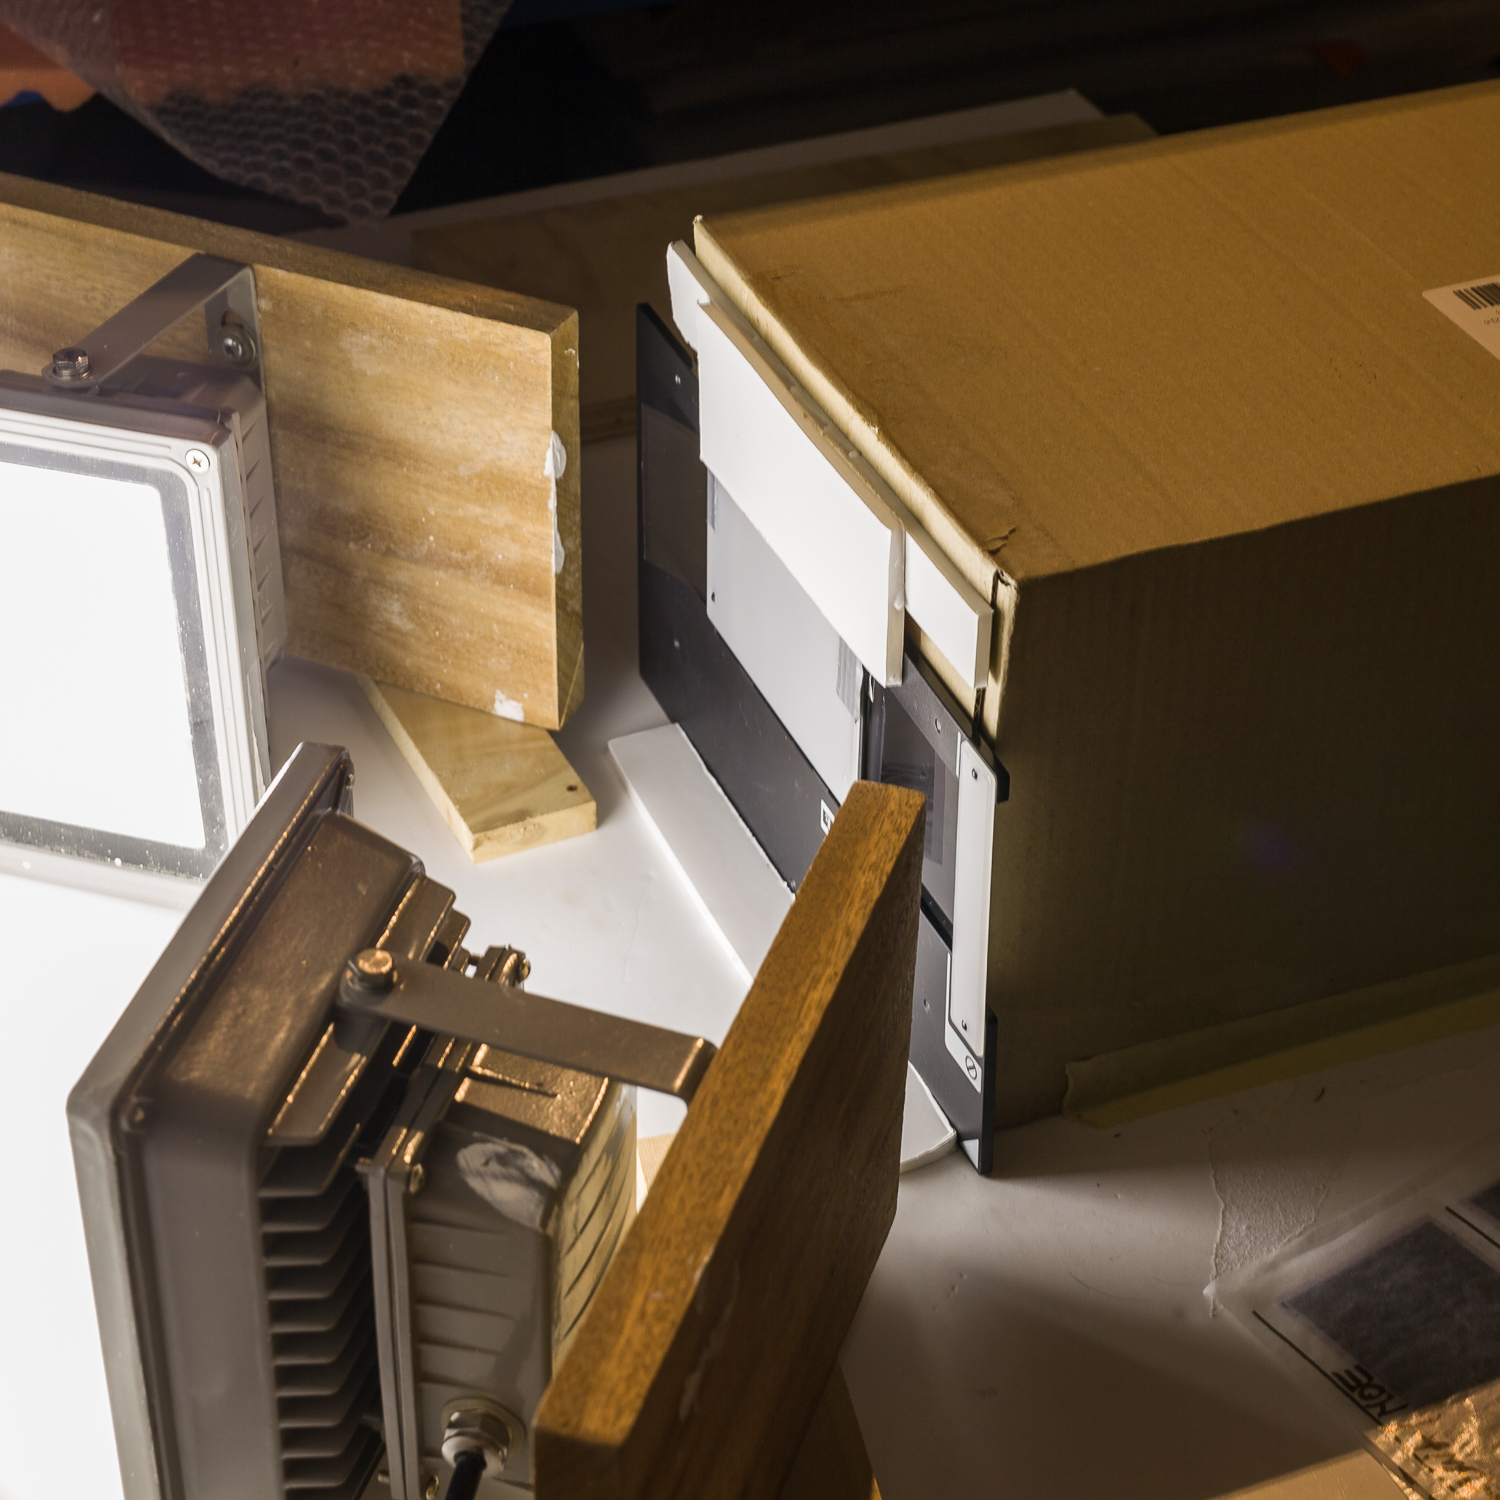
• On the base foam board, I fixed a sort of slot (foam board strip with double sided tape fixing) that holds the bottom of the film holder, between the slot and the cardboard box. On top of the cardboard box, I fixed a second slot, that holds the top edge lid of the film holder, and I slide the film holder in from left to right (right to left on the images)

• I put my camera to fit the film frame (with a little margin all around) and I have my settings to give best quality: ISO100, f8 1/6 sec … I vary shutter speeds based on the negatives I have (sometimes the negatives are a tad under- or overexposed, I try to have as much light as possible in my ‘scans’ without clipping the highlights). Low Iso for the least noise possible, f8 seems to be the limit aperture before diffraction sets in on this camera, shutter speed long enough to get rid of the flickering effect in the lamps. I work on a tripod and with a 2 second interval between mirror lock-up and opening the shutter. (standard available on the Canon 5Ds, to prevent camera shake due to the mirror flipping up)

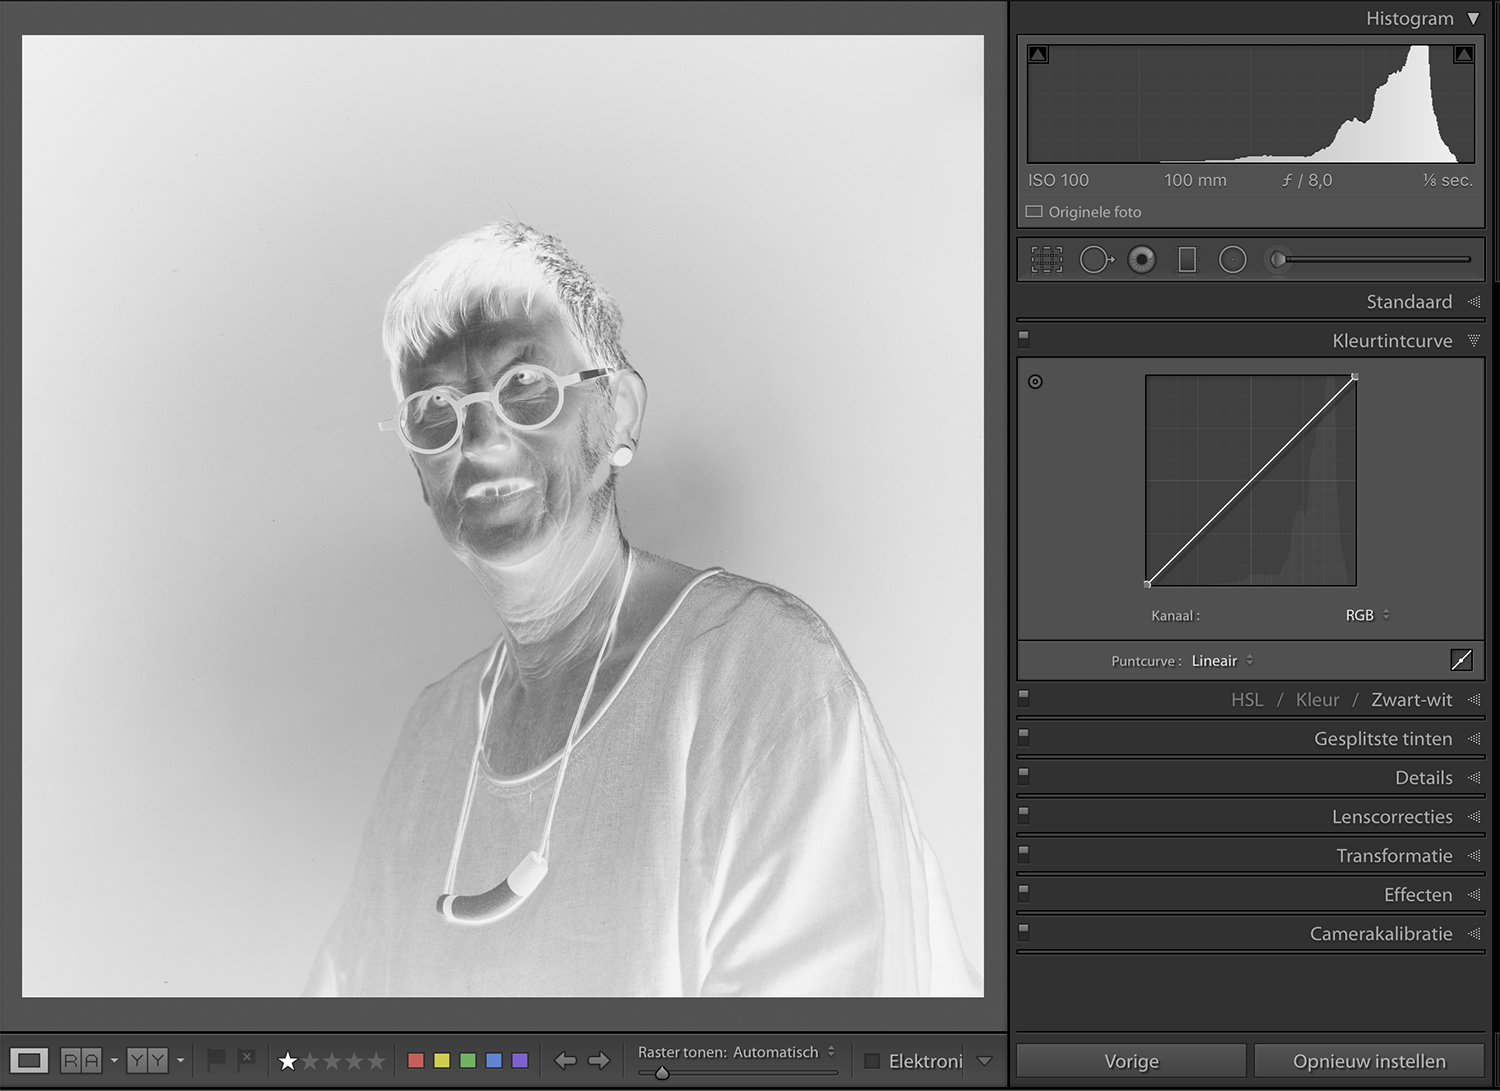
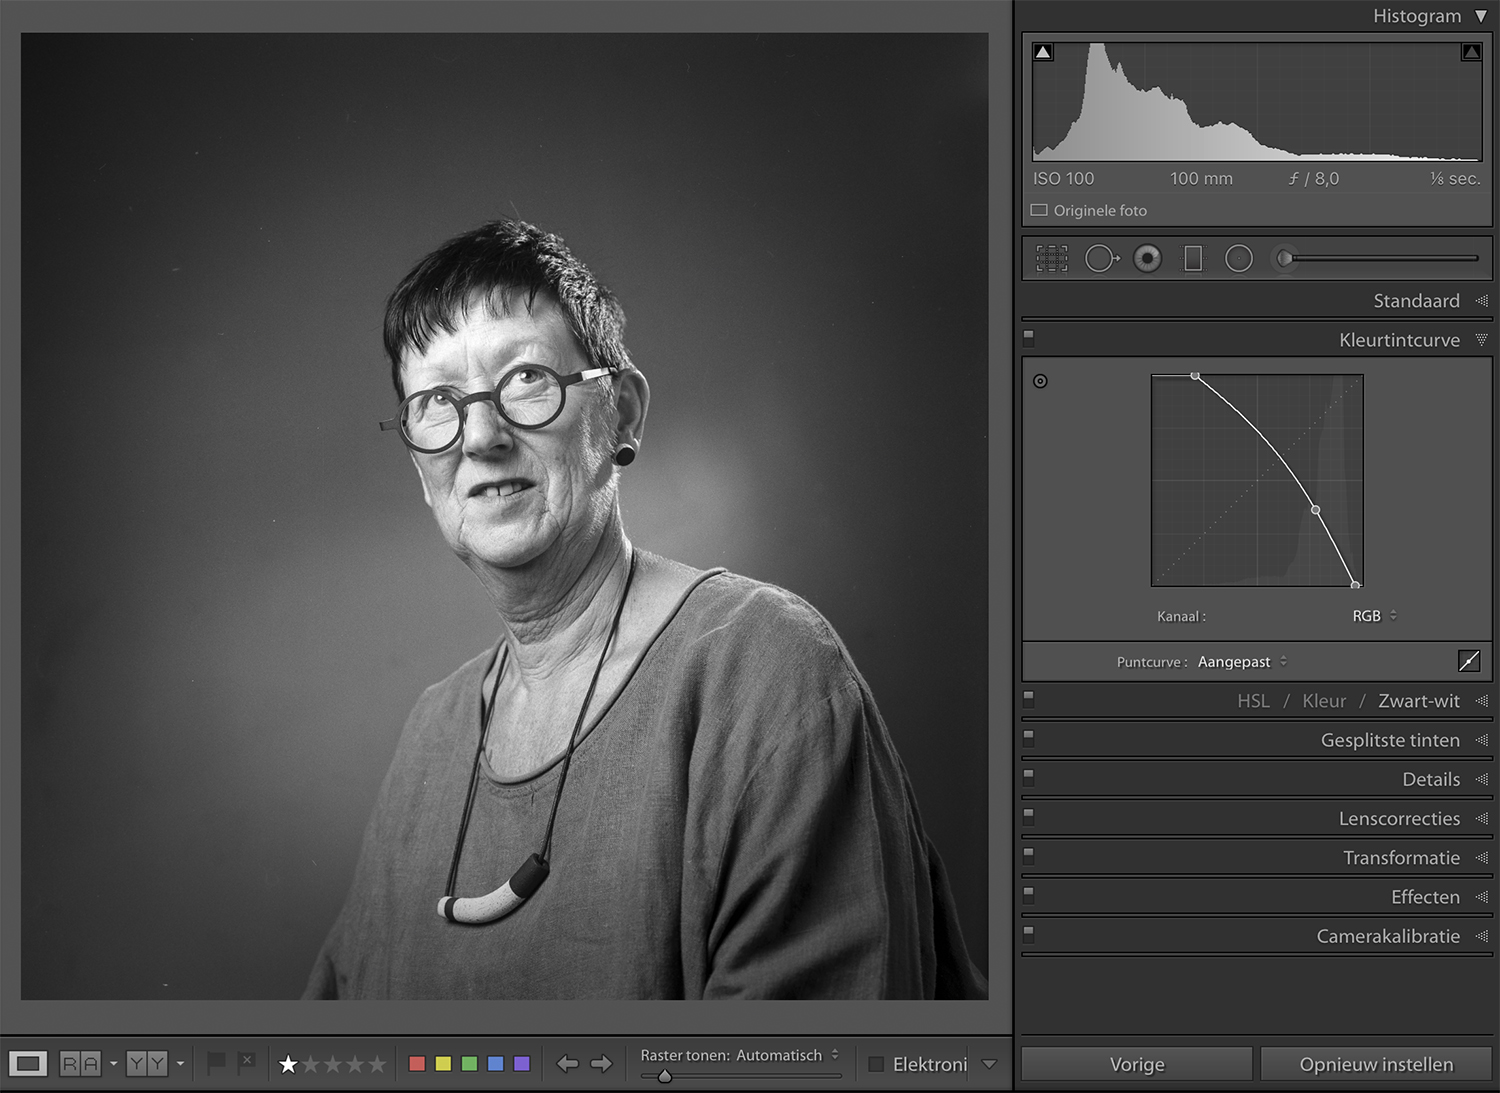
• I import the images in LR and reverse them by using the tone curve panel. In this same panel I also manage the white and black point settings by moving in the left and right corner point to where the histogram starts/ends, and eventually a lightening or contrast tone curve.

• Then I further develop the image using the standard development panel and local adjustments (that takes the most ‘getting used to’ because all sliders work ‘negative’)

• I remove dust and scratches in photoshop.


the images should clarify a lot:

the complete setup:


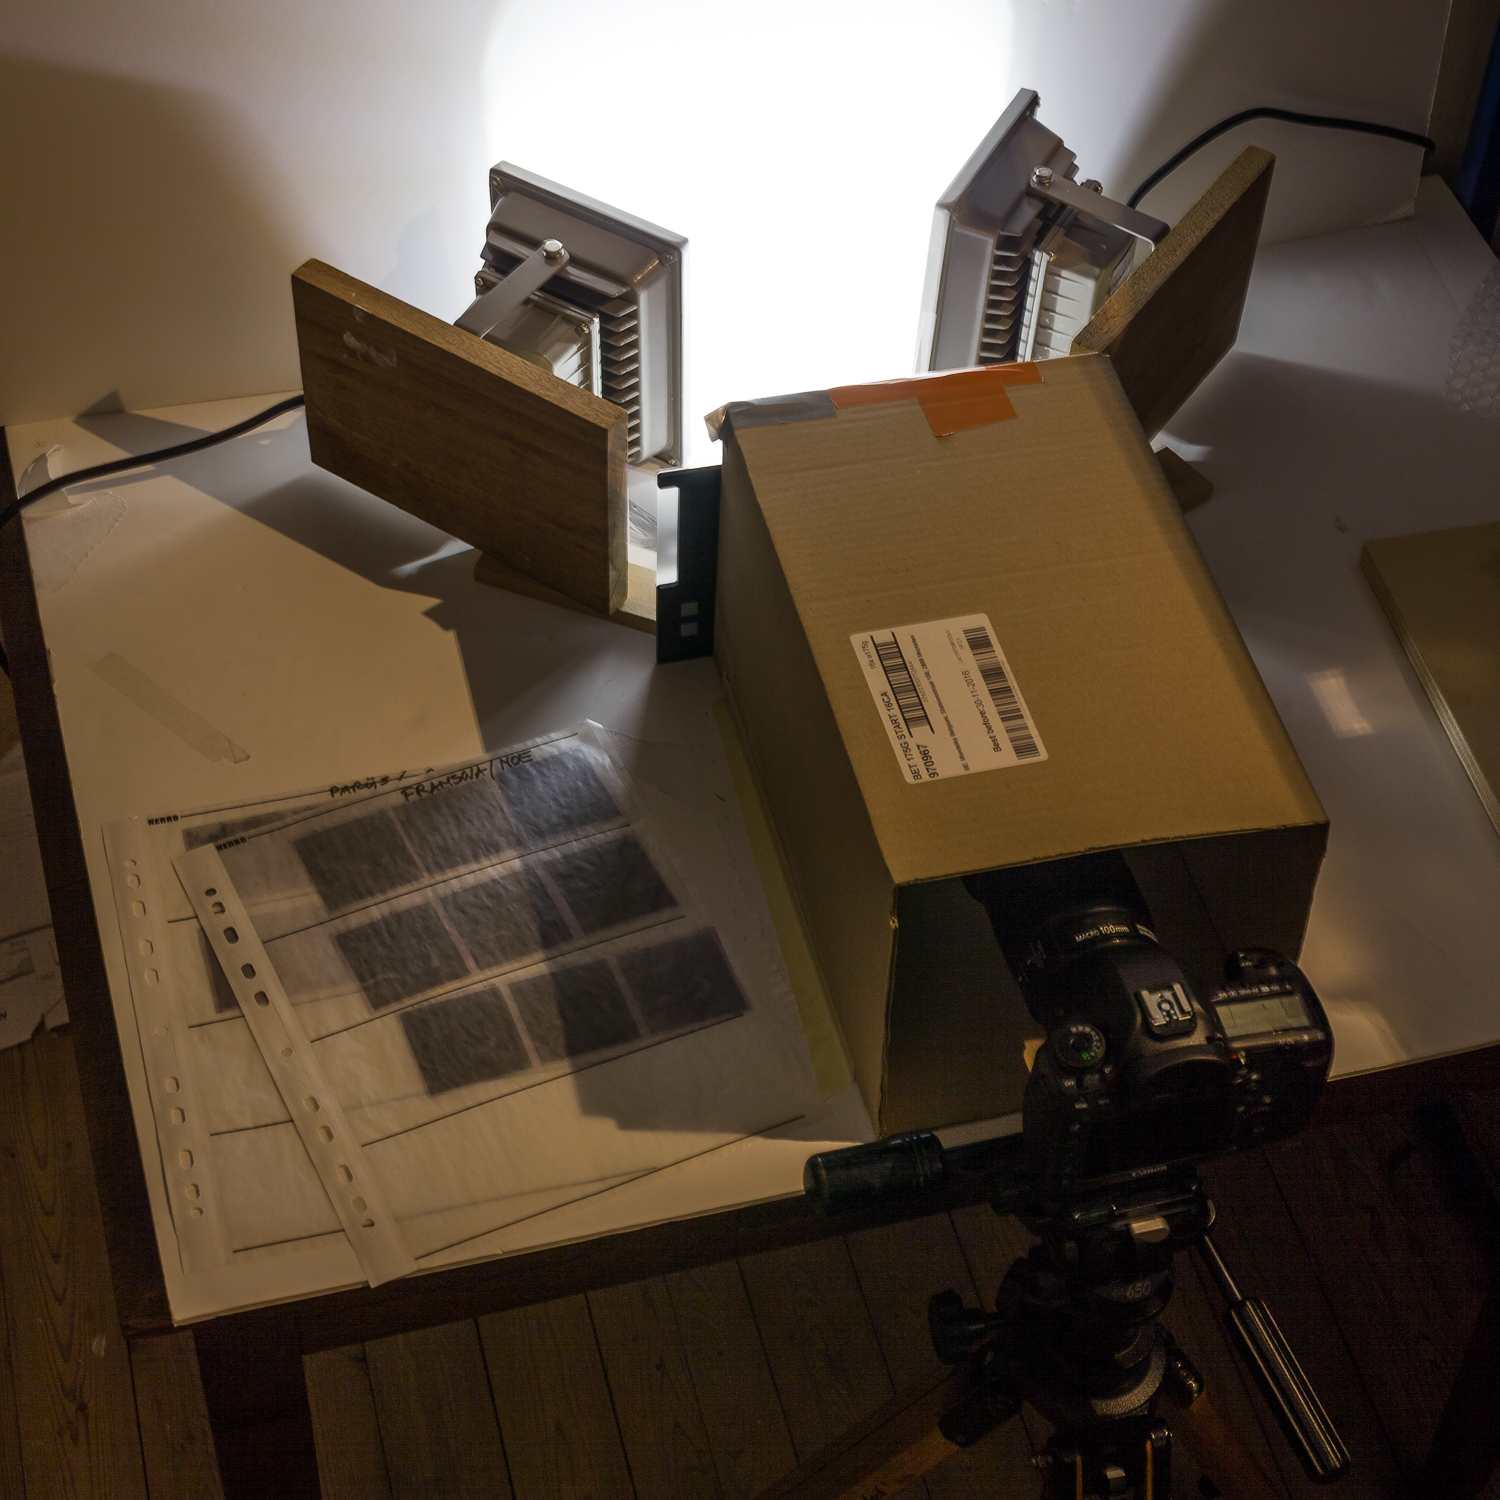
a look over the camera’s shoulder:

the negative holder removed to change the film strip

the back end of the cardboard box, notice the black paper frame on the inside, and the (modified today) film holder slot for top and bottom edge of the film holder.

film holder sliding in place, notice the top ‘tab’ being held by the slot

film holder in place, looking on the diffusor

Lightroom, tone curve for negative-positive conversion

I manage to scan a film of 12 exposures in about 15 minutes, with a resolution of at least 5000×5000 pixels. That is perfectly fine with me, and gives me all film detail, up to the grain in the film.

Book Landscapes

landscapes, personal tips & tricks, Tips and Tricks

for the upcoming exhibit I composed a book with my landscape photography … and other things that jump into my camera

I’ve used no texts except for the book dust cover, where you can read this, it might be inspirational to some of you out there, seeking their way into photography. It merely explains the title’s sub-line:

• I have long felt the urge to do something particular with my landscape photography, something outstanding and eye-popping. This has never led to satisfactory results because it was too often based on imitating other photographers.

This urge has changed over the years into a less stringent and stressful attitude and I have become to a point that I no longer worry about what to photograph. If I’m out in the field I much more enjoy being there, and photographs seem to come to me instead of me seeking them. This is a big leap forward for my own peace of mind and my photography has become a lot more enjoyable since. At least for me. I can only hope that the results are enjoyable to you too.

You will notice that I am not seeking the spectacular views or the exuberant colours in a landscape. For me it is about the sky, the mud, the trees shaken by the wind or standing strong. Solitude, lost memories, but also joy and tranquillity. •

Ludwig


New Publication – Goodlightmagazine

Nude, personal tips & tricks, Tips and Tricks

Goodlightmagazine, an online magazine specialised in photography lighting techniques has published an article by me about photographing nudes with available light. It contains a lot of examples, what to look for in a location, some basic rule explanations and very well crafted light diagrams.

make sure to check it out here:  http://www.goodlightmag.com/gift

just fill in your email address and you’ll be granted a free download of the current issue.

Personally I’m not very fond of the magazine layout, but the content is very good 😉

a sample of the first two pages of this 9 page editorial below:

best,

Ludwig

teddybear blues or … the story of self realisation

Analog, beauty, Behind the scenes Video, location, Tips and Tricks

I shot this series of images in February, it took me some time to scan and develop the negatives, but here they are at last. I hope you like the story, I loved making it.

A big thank you to Rachel, for being a very patient model, on this cold and dull day. To Nathalie, for being my assistant, model hairdresser, camera-crew and guide. To Home Providentia, for giving me another opportunity to shoot at this unique location.

All images taken on Rolleiflex 3.5 camera with Kodak TMax100 and TMax400 film. Reproduced with a Canon 5Ds and Canon 100mm F2.8L IS macro, developed in Lightroom and Photoshop.


• teddybear blues or … the story of self realisation •


behind the scenes video of this shoot here: Shooting with the Rolleiflex

thank you for watching


ludwig