Sirui mini tripod – my thoughts + a color image from Scotland, and a black and white from Corsica.

landscapes, photo gear

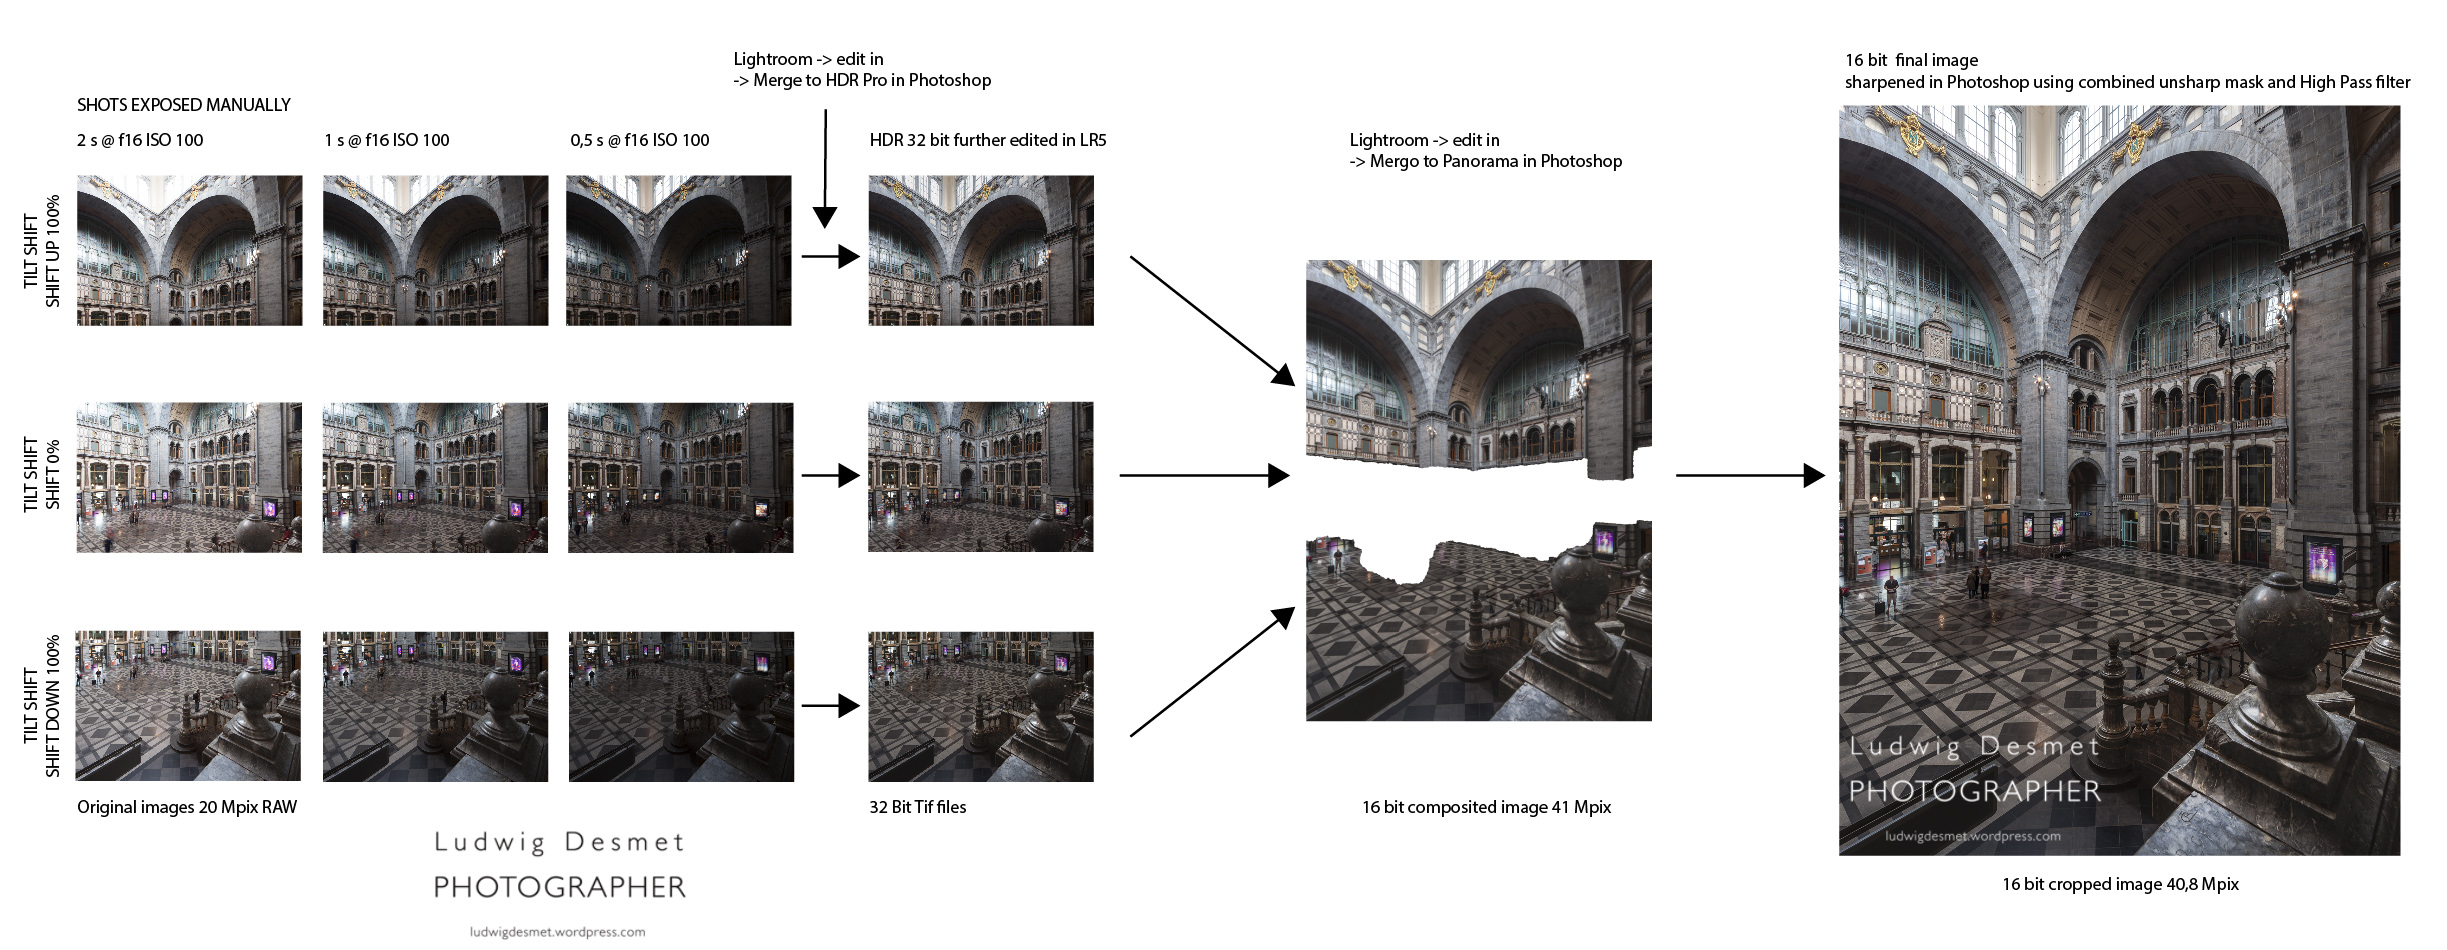
Hi there, for a change a gear review post.

For landscape work I have been a pleased owner of a Berlebach report tripod for many years now. I have had a little issue with it last year, which has been solved amazingly well by the Berlebach company, see my post about it here: https://www.ludwigdesmet.com/2016/09/19/thumbs-up-for-excellent-customer-service-berlebach/

I have taken this tripod with me on my motorbike on many occasions, mostly when giving classes to adults, but it is not very practical because the tripod is big. When mounted it extends beyond the two big panniers I have on my large bike! (BMW R1200GS).

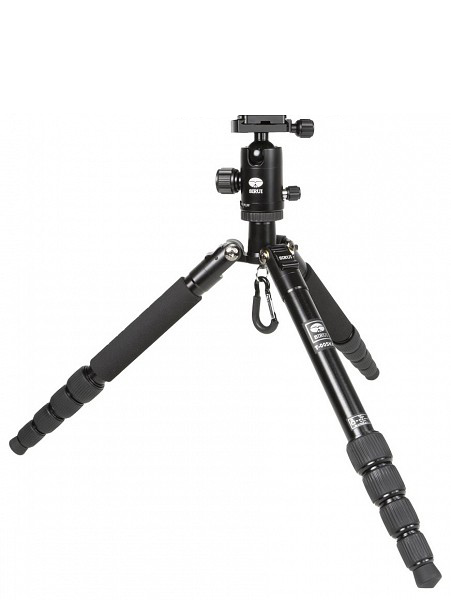
So I have been looking for a smaller tripod for last summer’s trip to Scotland, and for lighter travelling to Corsica weeks after that. I bought the Sirui T-005X with C-10S ballhead, from the T05X Series Traveler Ultralight

It is a lightweight, very compact package, weighs 0.8 kgs and has a maximum height of 137cm and a packing size of 33 cm. This makes it ideal for my motorcycle travels or when you are traveling light in any other way.

How did it fare?

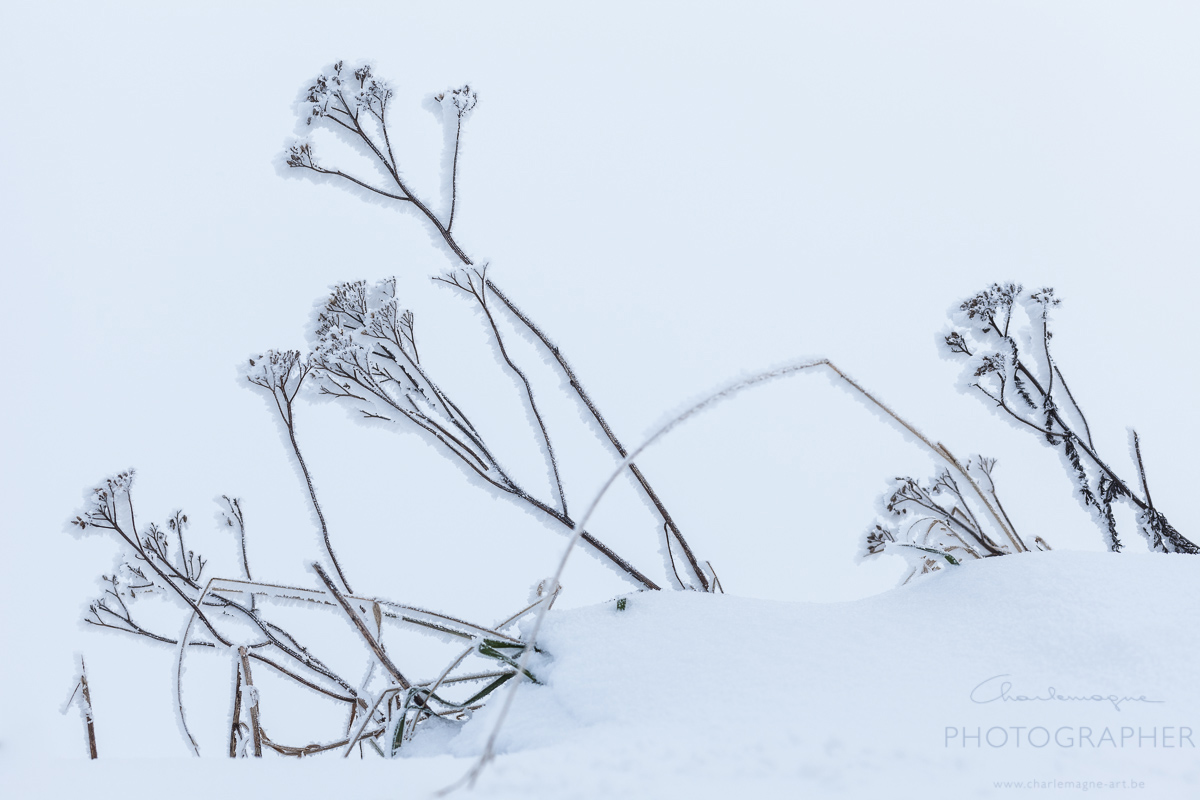
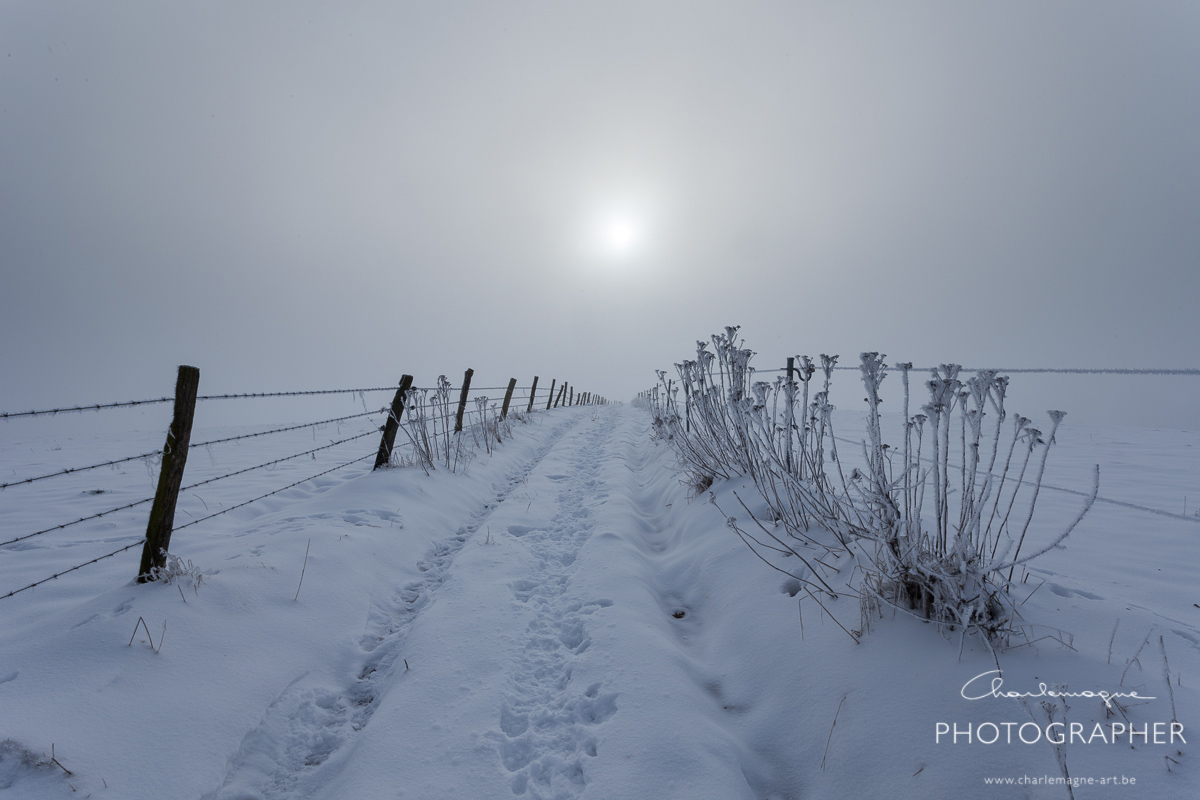
I found it very well performing in quiet weather conditions. The image below is a behind the scene’s shot on a trip out, rain pouring down all day, overcast and not much light, so a tripod was mandatory for I had pretty long shutter times. 0,6s at f11 and ISO100 for the below image.

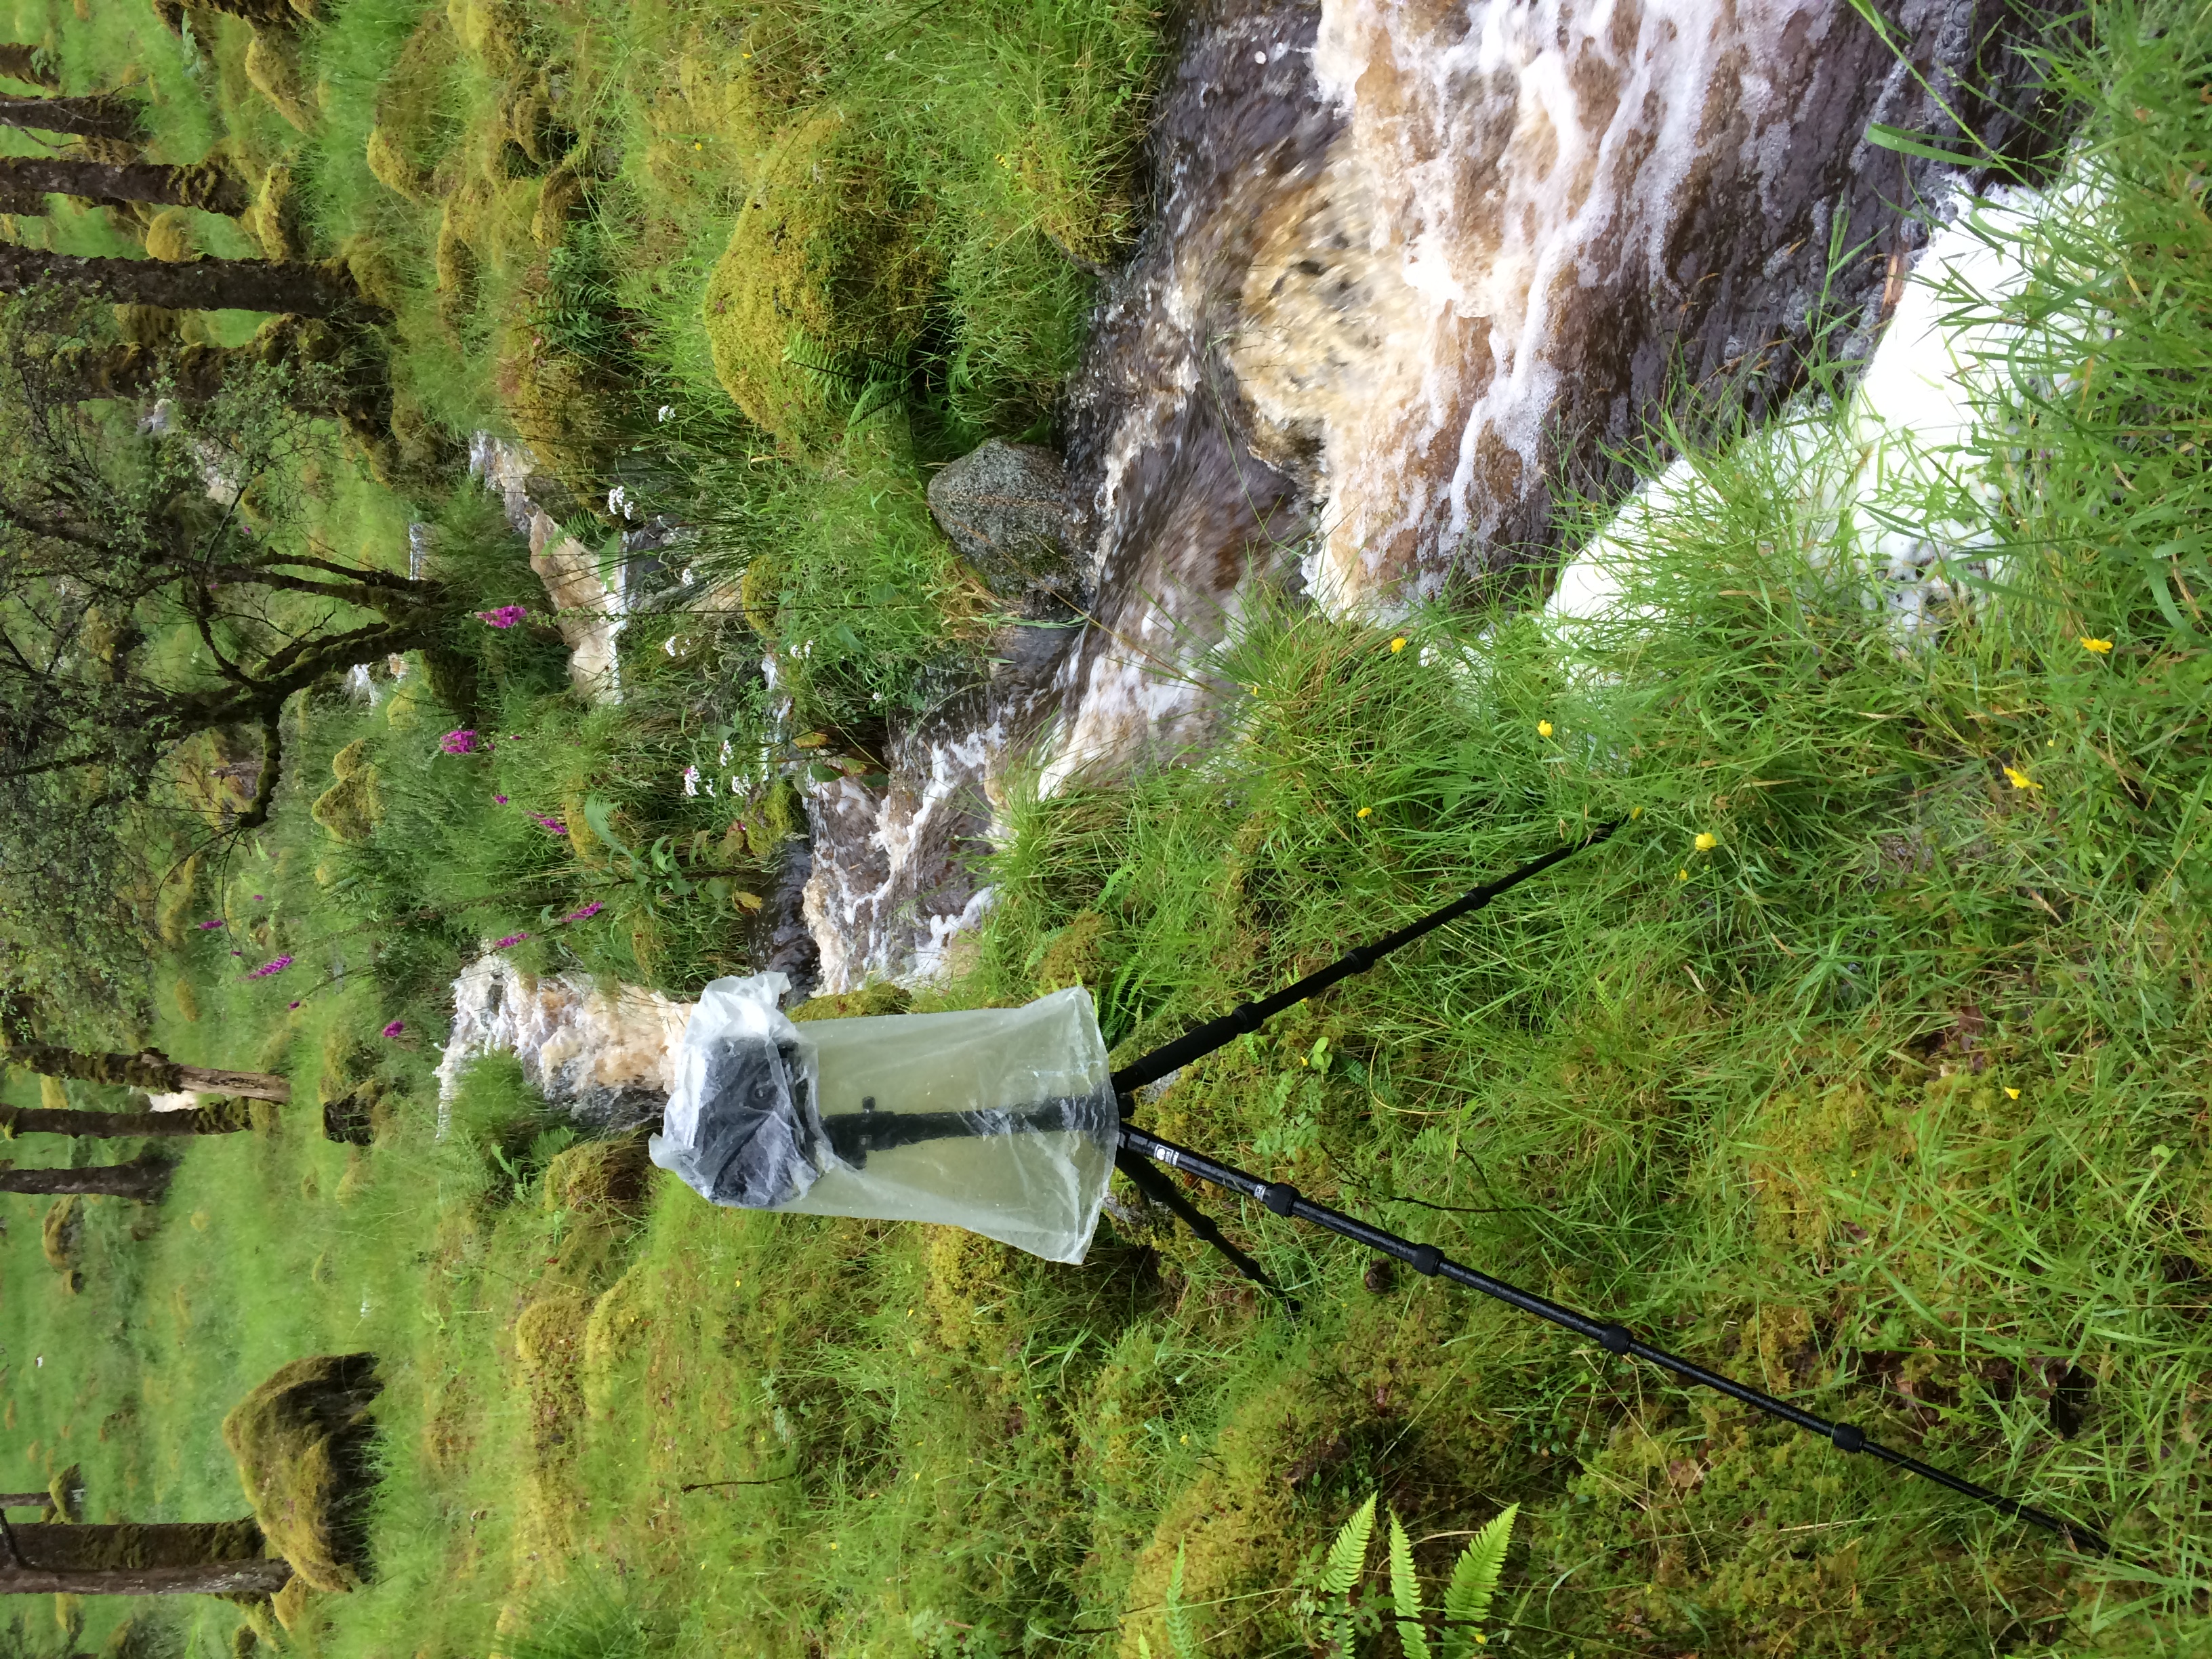
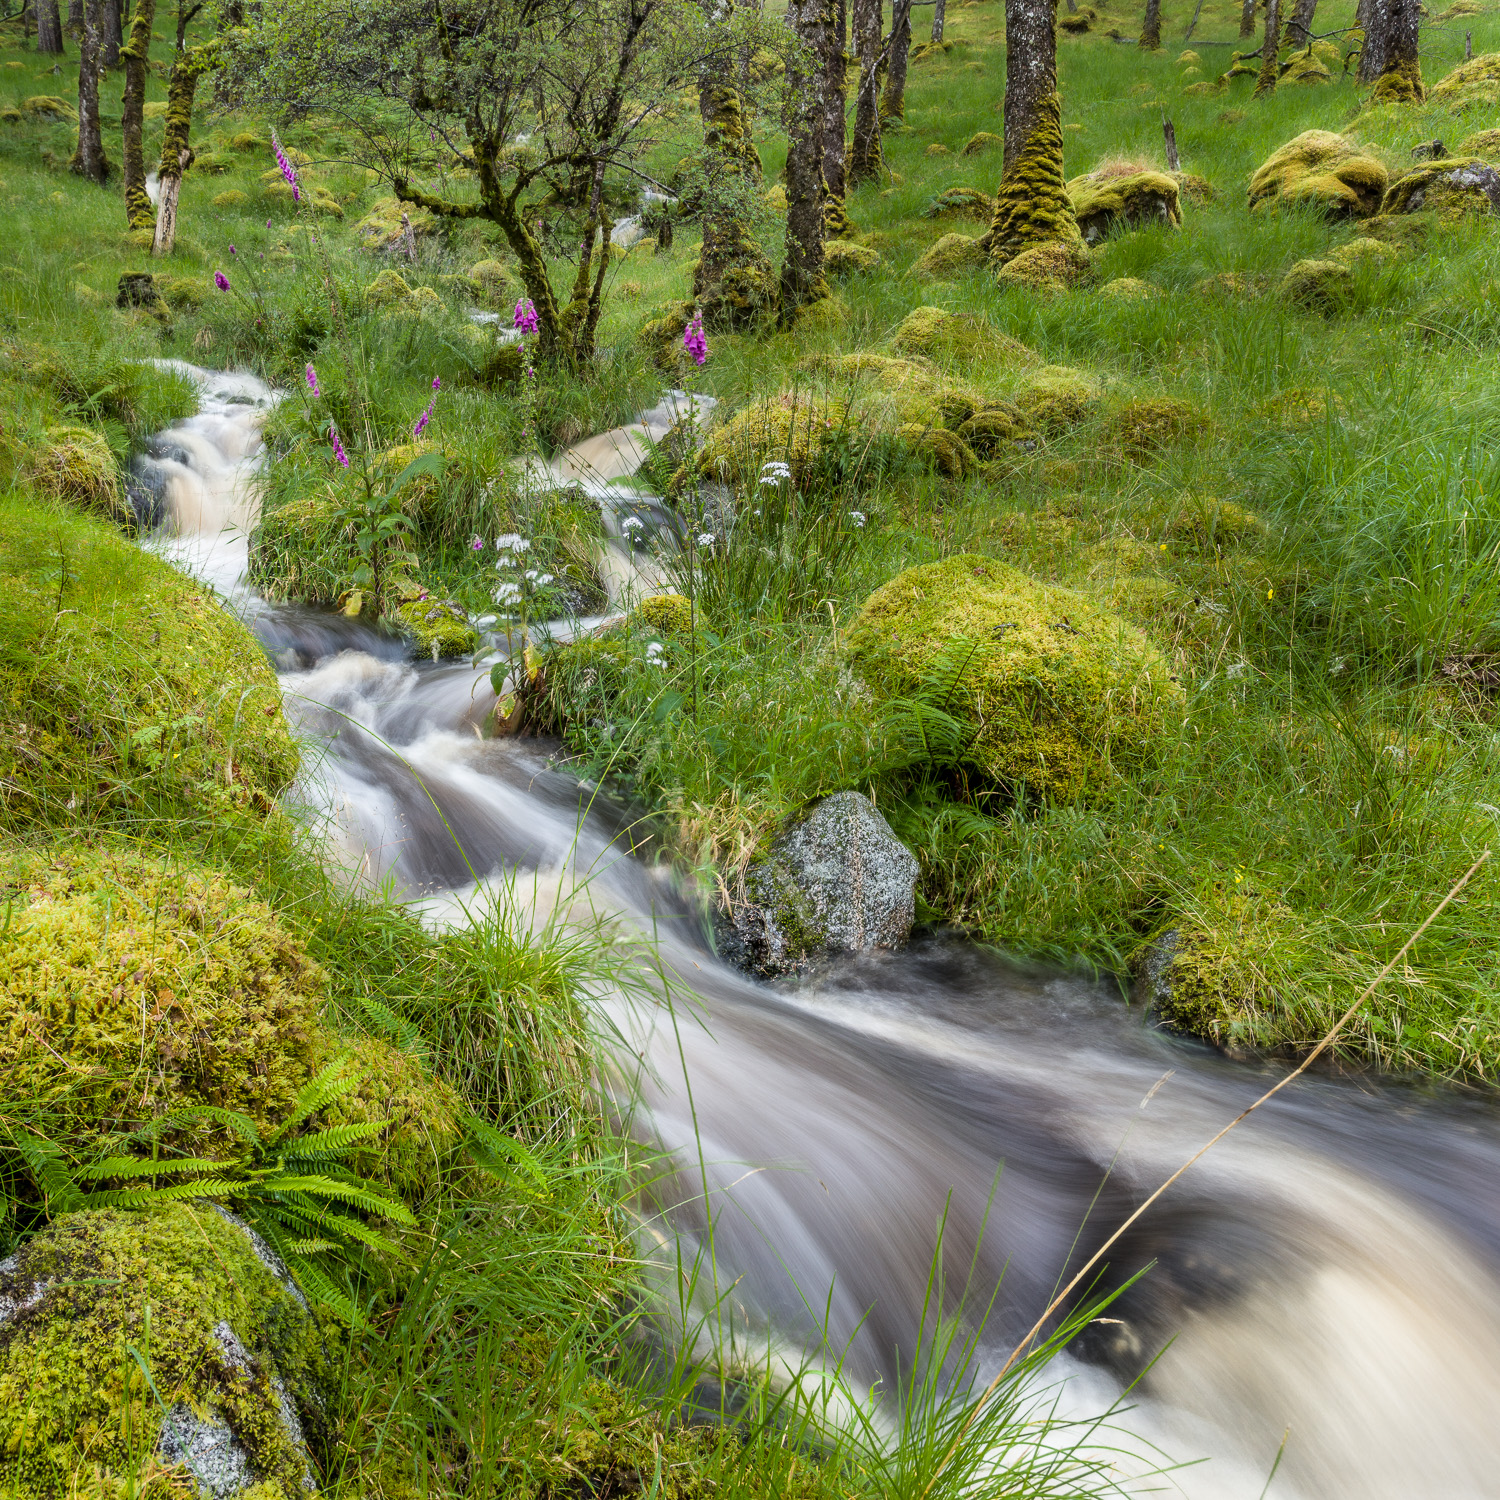
Image taken in Strontian, Ariundle, Scotland.

as you can see the tripod legs have several spread angle’s, which comes in handy on uneven terrain. The feet are very tiny at approximately 18mm diameter, so some care on where to put them is to be taken. Otherwise, the tripod gave me a perfectly sharp image.

When walking with the camera, the ball head clearly is too weak for a big DSLR (Canon 5Ds) even with a moderately light lens on it. (Canons 17-40 mm f4L, with a weight of 475g) The camera will start heading down soon, no matter how tight you fasten the head knob.

Otherwise, no complaints here.

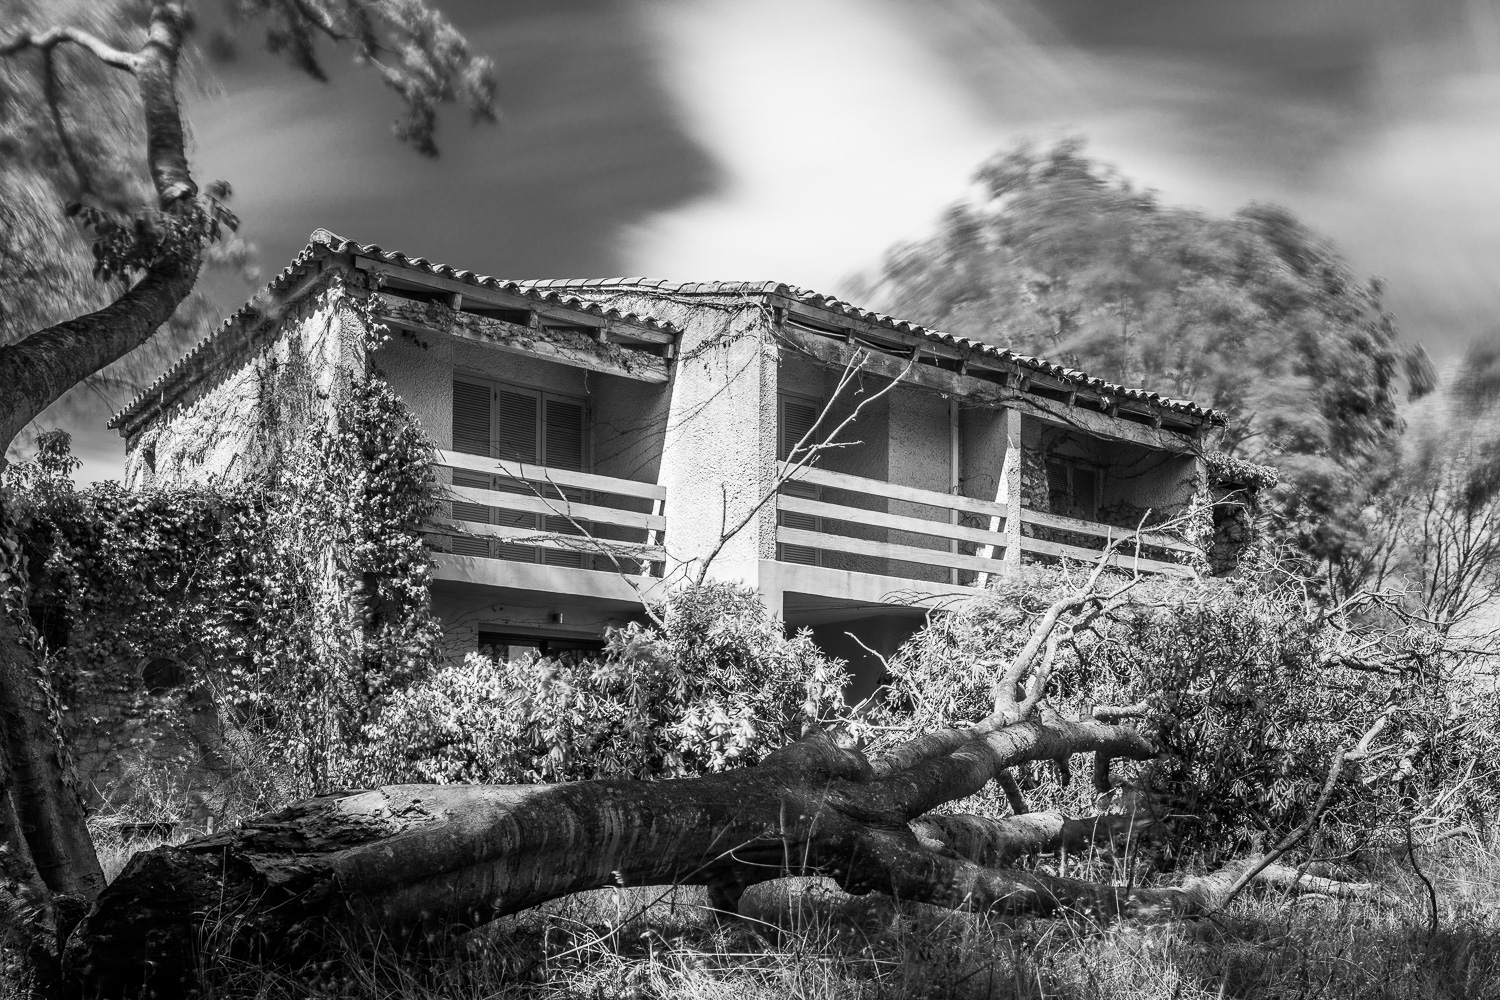
In Corsica I stumbled upon a deserted hotel, that inspired me to do some long exposure shots. The weather was sunny with clouds, and a rather strong wind, with gusts up to 80km/h (45-50 miles), the building was partly surrounded by green area, with scattered trees. Still I chose to remove the center column of the tripod, for increased stability. (the center column only supported in a single point is the least stable element in all tripods) The removal of the center column is really easy, and the ballhead then screws directly on the tripod base, resulting a much stabler unit. I have no behind the scenes image of this setup so I’ll grap a marketing image from Siriu:

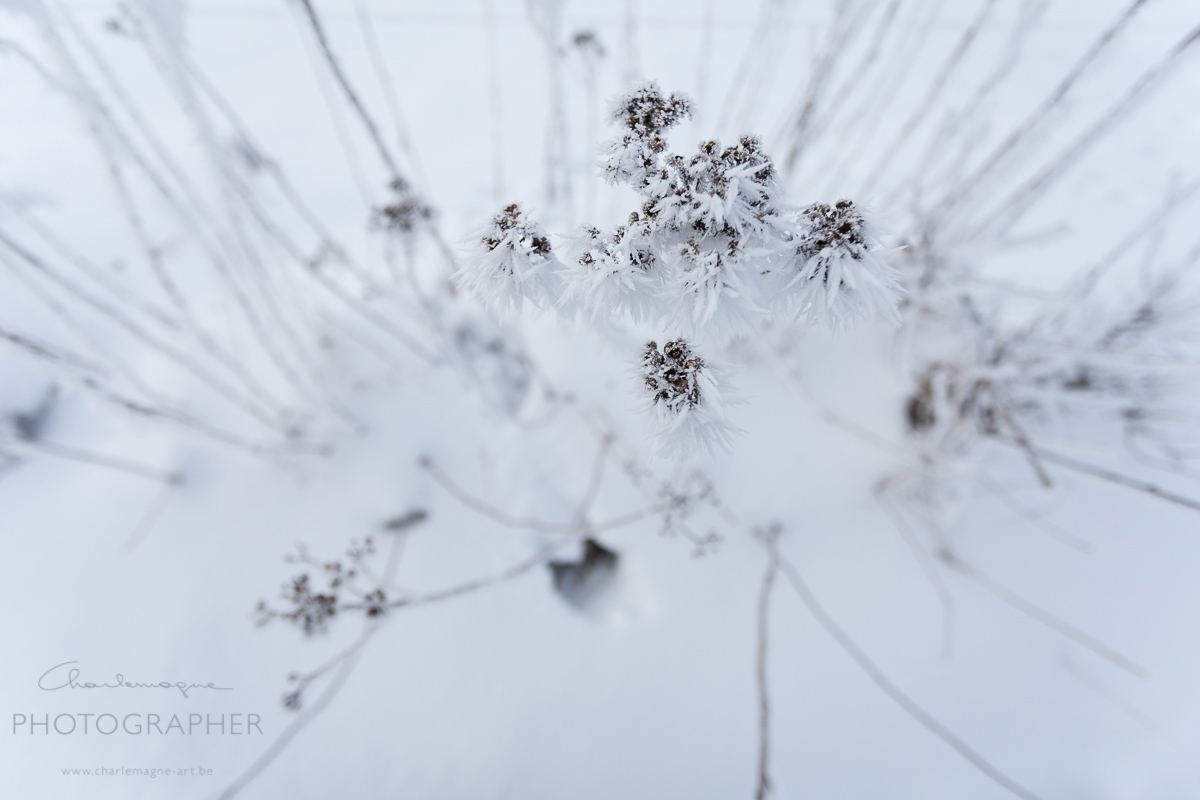
I still had the tripod set up with the legs fully extended in most images, and made perfectly sharp images with shutter speeds over 2 minutes: 121s f13 ISO125 and detail below. I have no images that show camera movements, so I think this is very good proof of the stability of this setup.


The downsides:

I find the leg opening/closing grips rather soft, and some seem to show some wear already, curious to know how long they will last. Also the camera plate is very small, this is clearly not aimed at DSLR users, but more towards the high end compact, light system camera’s. Fortunately the system is Arca Swiss compatible, so I can use my Berlebach dovetail type plates in stead. The ball head, although said to hold 4kgs, will certainly not hold its position when on the move. 4 leg segments are a bit long to extend, especially compared to my Berlebach, that has only two segments.

The pro’s:

Very light, very compact, budget friendly, stable within limits, easy to convert to ‘without center column’, then it is even more stable. Not expensive, comes with a carrying bag.

Verdict.

I am very pleased with this little tripod, it fits my motorcycle panniers, it is very light, it extends high enough for my landscape needs and it is stable in light windy weather. I’m a bit afraid that heavy conditions will not be good friends with this tripod, but If you are looking for an easy to carry companion for night shots or occasional landscape work, I can recommend! And at a very fair price of € 109, it won’t break the bank!


Ludwig


Thumbs up for excellent customer service – Berlebach

photo gear, Uncategorized

I do not often speak about material I use, or my brand of camera’s being better than the other one, … you know what I mean, mainly because I don’t think gear matters all that much.

It is a pleasant thing to know  your gear will be working whenever you need it, so I do appreciate reliability and so, but I don’t think that you’ll absolutely need the latest gear to make good images.

This said, I would like to write this little post about the makers of the tripod I have been using for about 6 years now. It has been facing salty sea water, clamping down on my motorbike, rain and ice, mud and dirt, and all nice things in between. The brand is Berlebach. They are nice ash-wood tripods, comparable to the type of tripods land surveyors use for their theodolites. Not excessively expensive, very sturdy, very stable (wood has the natural ability to absorb vibrations), very well finished and beautiful to look at. They don’t get your fingers freezing in cold temperatures, all good things. The downsides: they are heavy, mine does have long leg segments, which makes them(it) a bit cumbersome on long hikes. Mine is from the Report series, and it features a very handy ball-joint built into the tripod itself. This makes levelling the tripod a piece of cake, no matter what surface you are working on. The head is a three way head, all metal, beautifully finished and with a very tight grip.

Now, after six years of good service, one of the handles broke. It happened on the way back from the institute where I teach photography classes. My tripod was tightly secured on my motor when suddenly I took a road bump (they happen to be quite present here in Belgium) and I heard some clattering under the bike. Stopped, saw the handle in the middle of the street. It just broke off of the tripod head. No idea why or if it had been damaged before or …

So I sent an email to customer service to ask if they still could provide a replacement for this handle. The answer was short and very clear “Dear Ludwig, we will send you a new handle”. I thanked them and asked if this would be a payable replacement, that I would understand that since my tripod was at least 5 years old (didn’t bother looking how old it was exactly) …

Again a quick reply: “No, it will be sent free of charge, we only need your post address.”

😀 😀 😀

It dropped into my mailbox a couple of days later, not the same design, but even more handy, since a little smaller. Now here is my thought about this all: Where do you find companies these days that, after 6 years of buying their goods, will replace a part for free, send it for free, all with a smile? Thank you Berlebach!! www.berlebach.de


berlebach-tripod

ludwig

HDR composited image workflow

architecture, Personal Pictures, personal tips & tricks, Tips and Tricks

Making a panoramic image in Photoshop is pretty simple, in the menu you go to file->automate->Photomerge, there you select your images, press enter and photoshop does it all for you, no hassle. You’ll just need to crop afterwards and your done.

Making a HDR image in Photoshop is pretty simple too, in the menu you go to file-> automate->Merge to HDR Pro, follow some easy steps, choose if you want to work 16 bit or 32 bit, choose wether you want to edit in Adobe Camera Raw or just save a 32 bit file, and further edit in ACR or Lightroom (since version 4)

Now making a panoramic image that has been shot in exposure bracketing, is a little more complicated, although a logic iteration of the above two workflows.

Here’s what needs to be done (Lightroom/Photoshop workflow)

000. Work with your Autofocus off for your exposures, focus once, then leave your focus be, work manually, work on a tripod, with preferably a panoramic head, or, as in this case with a Tilt-Shift lens.

00. Make sure you get sufficient overlap in between images (1/3 of your image is a good average)

0. Make sure you get the same exposure bracketing series in all your images

1. Grab your first bracketing series in Lightroom, right click and Edit in -> Merge to HDR Pro in Photoshop.

2. Photoshop will run trough a series of actions, and will bring up the HDR pro interface.

3. Now you’ll choose 32 bit, remove ghosts if necessary (only available from 3 or more images, and good if you have moving elements in-between images.) and just click OK.

4. Your 32 bit tif file will appear awful in Photoshop, no panic, just click the save button. (not save as, as this might save your image in a different directory than the original one)

5. Back in Lightroom, you should be able to see your image as filename-edit.tif You can edit the image just the way you edit RAW files, except now you have 10 stops exposure range up and down. Work with exposure, highlights, shadows, blacks and whites to get your image correctly edited. It might be a good idea to do lenscorrections in at this stage. (lens deformations and chromatic aberration, no perspective corrections)

6. Do this for all your bracketing series, try to develop the different images the same way. Avoid too many local corrections, as you will not be able to synchronize them because they will need to be applied in a different spot in every different 32 bit image.

7. Now the final step is just to make a panoramic image from all our previously edited images: select all your edited 32 bit files and right click -> edit in -> Merge to Panorama in Photoshop

8. Photoshop will gather all images and nicely align them out, make layer masks according to the images content (actually it searches for places where there’s no geometrical difference in two consecutive layers, to make the transition at that spot. That may lead to awkward layer masks, but the result is generally good.

9. Crop the image to get rid of white edges (photoshop will do transformations to compensate for lens corrections, or to get the perspective in-between images working ok)

flatten and further edit if needed (sharpening, filters, …)

10. Sit back and enjoy your work.

Visual representation of the workflow (click for bigger):

workflow

A small version of the final image.

This is the entrance hall of the Antwerpen Centraal train station:

Ludwigdesmet_HDR_PANO-2

Thank you for reading, you might as well follow my blog now you’re here :p

Ludwig

Teaching architectural photography

architecture, Personal Pictures

Hello there,

A post about my teaching job at Kisp this time.

KISP is a evening classes institute giving adults the possibility to change careers, enrich themselves with language courses, learn how to cook vegetarian meals, meals with Belgian Beer or learn how to execute bike repairs, amongst a ton of other things. Photography classes are immensely popular at our institute, so we count over 1000 students currently following one or more semesters of the photography program, a program that exists in 10 different classes, normally running over a 5 year period.

I have been teaching photography classes for 3 years now, and I am currently teaching 4 classes, two Lightroom development classes, two architectural photography classes.

Teaching is a good way of fine tuning and deepening your own knowledge on the subject, and I admit I have learnt a lot in preparing my courses over the last 4 months.

It has been a joy to see my students discover the multiple facets of architectural photography, something that a lot of them at first would classify as a boring and dull subject in photography. Architectural photography is one of the ‘advanced’ segments, so these students have done at least 4 preparatory classes.

We are not blessed with a lot of rich and blooming architecture here in Belgium, so it is quite a challenge to find interesting building projects that are accessible to a group of students. Especially since we arrive only at a time that most office desks close down for the day. We usually start at 6:30 pm and work trough the night, till 22:00 hrs. Often we have to deal with security people to get access to a building, mostly we are very welcome.

Unfortunately I cannot post work of others, but i would like to show you some of the pictures I took in between tutoring and solving technical questions from my students.

They are often not perfect because I carry very little equipment myself on these hands-on evening classes. I often don’t take a tripod with me and only a single lens, or maybe two.

Subjects tackled so far: building in it’s environment, perspectives, composition and equilibrating elements in your image, light and lighting. This is only a very small selection, there is some more on my facebook account here: Album architectural photography classes

LudwigDesmet_Kisp_archi-5096

LudwigDesmet_Kisp_archi-5057

LudwigDesmet_Kisp_archi-5081

LudwigDesmet_Kisp_archi-5368

LudwigDesmet_Kisp_archi-5379

LudwigDesmet_Kisp_archi-6658

LudwigDesmet_Kisp_archi-6689

LudwigDesmet_Kisp_archi-8411

LudwigDesmet_Kisp_archi-8416

LudwigDesmet_Kisp_archi-8498

LudwigDesmet_Kisp_archi-8558

LudwigDesmet_Kisp_archi-8548

thank you for reading, see you soon,

Ludwig

Photographing sculptures

assignments, Personal Pictures

Hi,

last summer I was asked by a belgian sculptor, to photograph some of her works. She’s working on ceramics and sculpting mainly. you can find her new site here: Sylvia Hens (the site is currently being rebuilt)

She had especially requested to work with existing light, and to try to emphasize on the emotional expression of her works, I was not sure I understood her completely, but she assisted during the shoot, and she was very happy with the results we achieved together.

So all the images are taken with available light, sometimes with the aid of a small reflector. The reflector could even be a simple sheet of white paper.

All exept the first two images were taken inside the lovely house of the artist, with little light. I made very good use of my tripod to prevent camera shake.

I hope you like the images, make sure to check out the website of the artist.

Sylvia hens-1202

Sylvia hens-1305

Sylvia hens-1337

Sylvia hens-1365

Sylvia hens-1413

Sylvia hens-1431

Sylvia hens-1478

see you soon.

Ludwig

Photographing the Harley

Personal Pictures, personal tips & tricks

As an end of study assignment for my studio/object module (photography courses at kips.be (Ghent Belgium) we had to propose an object to photograph.

amongst the possibilities were ‘perfume’ or ‘jewels’ …

I wanted to do something more ‘tangible’ and proposed a Harley Davidson motorcycle. My mentor could choose if he categorized it as being a perfume or a jewel. I guess both of the categories apply.

The Harley is not mine, its a customized 1981 Electra Glide from a friend of a friend, and hardly recognizable from the original. François is the owner of the bike.

the subject

I had surfed a bit for inspiration too. There’s not so many studio shots of motorbikes on the internet, here are a few:

inspiration

I had made some preliminary studies in 3D rendering (thats still my main job). I had discussed with my teacher that it would be best to lit the subject indirectly, with a large soft box from above. Since we don’t have softboxes that big at school, I had to come up with something else.

the virtual world

and then the ‘thing’ arrived.

I had shown François where in the school we wanted to shoot the bike. (I had three other classmates doing their work in the proper school studio, so I had to move out to another class) And he just drove it trough the hallways of the school. All students were awake at once on this early saturday morning.

3R7A0589

So, what’s next? You see me setting up the tripod and camera.

3R7A0596

Checking on the framing, remote shooting with a portable mac, to be sure not to touch the camera in between shots. (I wanted to be sure I could compose different shots together in photoshop afterwards)

3R7A0600

Me setting up a flash light for indirect flashing on the cloth. The cloth will serve as a huge soft box area.

3R7A0603

The setup, seen from the backside, you can see the tripod in the back:

3R7A0607lores

A big thank you to Serge (classmate) for these splendid behind the scenes pictures!!!

These are the original shots used for composing the final image. Note the shot with the white paper on the floor, for extra light from underneath.

For those interested, the shots were made with the Canon 85mm f1.8 at f10 shutter speed 1/125, ISO 100. Three 600Ws monoblocks at 3/6 upto 6/6 power, indirect on the cloth above.

originals

then the photoshop layered file for compositing. I named the layers in english, for your convenience (dutch is not really an understandable language)

photoshop compositing

and then at last, the finals, click to see them bigger:

charlemagne-art-Links final

charlemagne-art-Rechts final

A big thank you to Anita, for bringing me in contact with the owner of the bike,

a big thank you to my assistants of the day – classmates Stef, Serge and Geert,

a big thank you to the owner of the bike, François, for driving about 60 miles to the studio, on a cold morning.

hope you’ve learned something.

take care, and see you soon,

Ludwig

architectural compositions

architecture, Personal Pictures

When I was still in my architecture module (evening classes photography) we were asked to photograph a museum interior with composition in mind. Not the building as such was important in the result, but mainly the distribution of elements in the picture. Not a simple, but a very interesting exercise. Balancing weights, colors, working with lines, structures, perspectives. Photography becomes a very graphical art. The building is a museum building in Ghent, Belgium.

It is absolutely necessary to work on tripod for such an assignment, because this allows you to carefully study your preliminary results, and eventually do very subtle corrections to your composition. I have a tripod with a 3-way head, which is interesting, because you can just modify one axis, without moving the other ones. (vs. a ballhead, which releases all axes at once)

I just noticed yesterday that I hadn’t published these images before, so here they come. Clickable for a bigger size.

charlemagne-art_smak-9564

charlemagne-art_smak-9571

charlemagne-art_smak-9588

charlemagne-art_smak-9596

charlemagne-art_smak-9610

charlemagne-art_smak-9627

charlemagne-art_smak-9634

Thank you for watching. And remember, any question you have please ask.

Take care, come again soon.

Ludwig

Winter in Belgium

landscapes, Personal Pictures

Hi all,

we are not so used to having cold winter in Belgium. We usually have a moderate climate, influenced by the warm gulf stream waters, coming from middle-America.

But, some two weeks ago, a package of snow arrived, about 5 inches thick, some extra snow fell a couple of days later, and we had cold winter temperatures, with -15°C as a minimum.

Enjoy the pictures I took in the morning, two days ago. I’m not so fond of the Belgian landscape in general, but I enjoyed the marvels of snow and ice, and the misty morning added to it’s magic.

No more words, just images!

charlemagne-art-winter-2841 charlemagne-art-winter-2845 charlemagne-art-winter-2846 charlemagne-art-winter-2912 charlemagne-art-winter-2929 charlemagne-art-winter-2935 charlemagne-art-winter-2940 charlemagne-art-winter-2943 charlemagne-art-winter-2955 charlemagne-art-winter-2961 charlemagne-art-winter-2970 charlemagne-art-winter-2974


see you soon, I have two more beauty shoots to post!

Ch.

(from Charlemagne – my other name)

fireworks 2012

Personal Pictures

Bommels 2012, Ronse has its carnival on the 2nd monday of the year officially, but actually the saturday before is the main attraction, with the fireworks and all.
Last year we (me and my sons) almost got frozen, we waited for 1 1/2 hour in the cold and didn’t see fireworks, because the organization messed a bit up, and fireworks were delayed by about two hours.
This year they were well on schedule, and we saw a magnificent spectacle. I chose to view the fireworks from a distance, up in the hills surrounding Ronse. My best shots: – click for bigger view –

took them on a tripod, cable release and Bulb exposure mode. This allows for vibration-free shooting, and a controlled amount of firework burst in your shots. All images with 135mm f2 @ f9.0 and ISO 100.