Hi there, as I promised before, welcome to this informal tutorial on digital development.
Not a tutorial pure sang, but a simple step by step example of a development of one of my images.
Just to make you aware that a good image from your camera can even get better with that little extra attention afterwards.
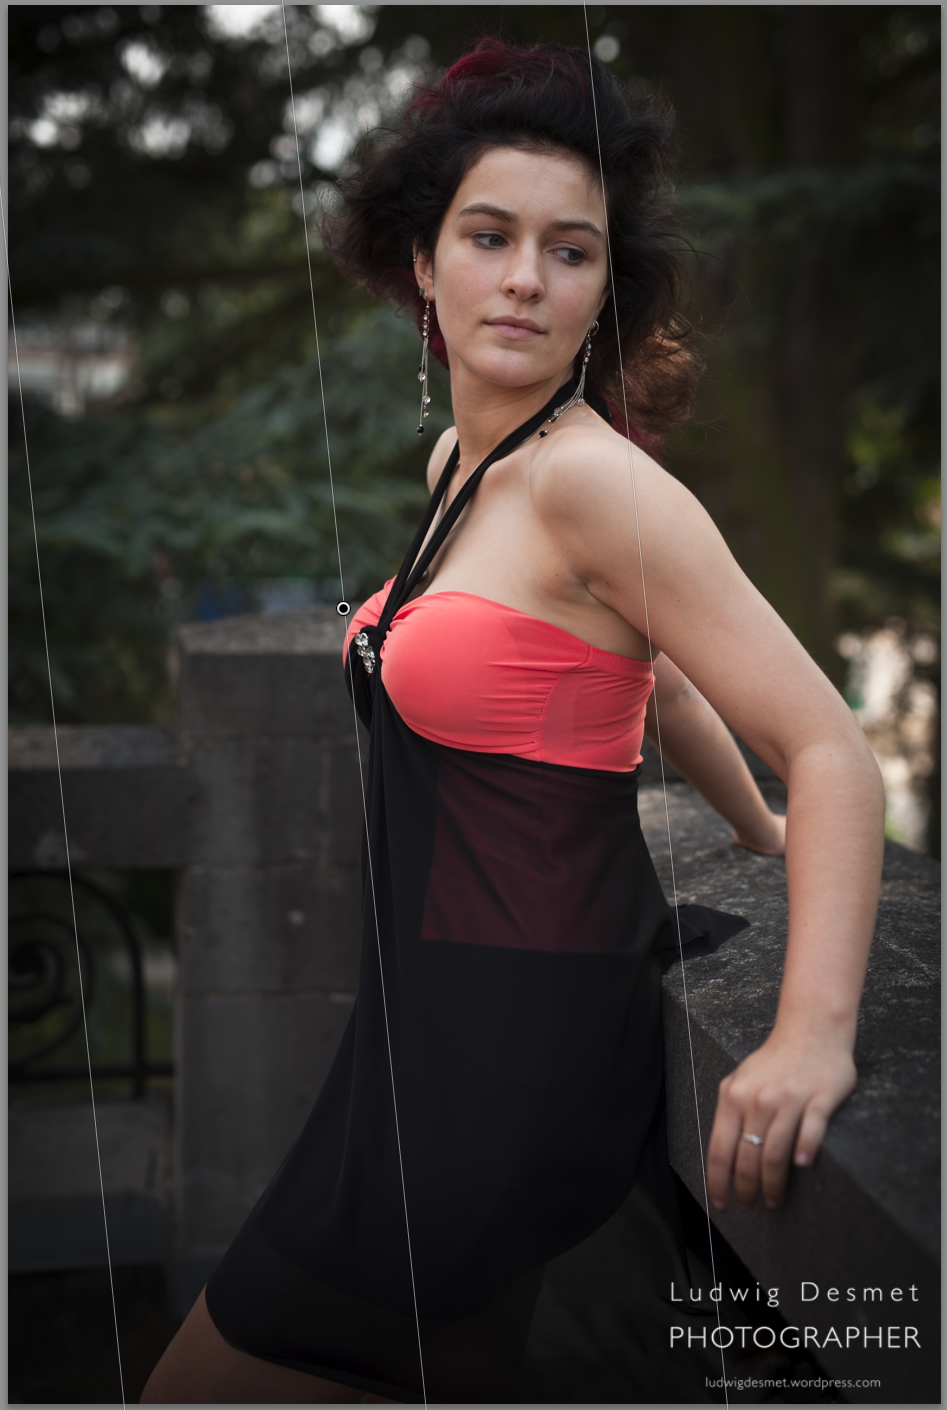
First a before and after screenshot from the image at hand.
I’ve uploaded them big, for your convenience. Click for full size.
Model: Kimberly D.
Photographer: Myself of course: Ludwig Desmet
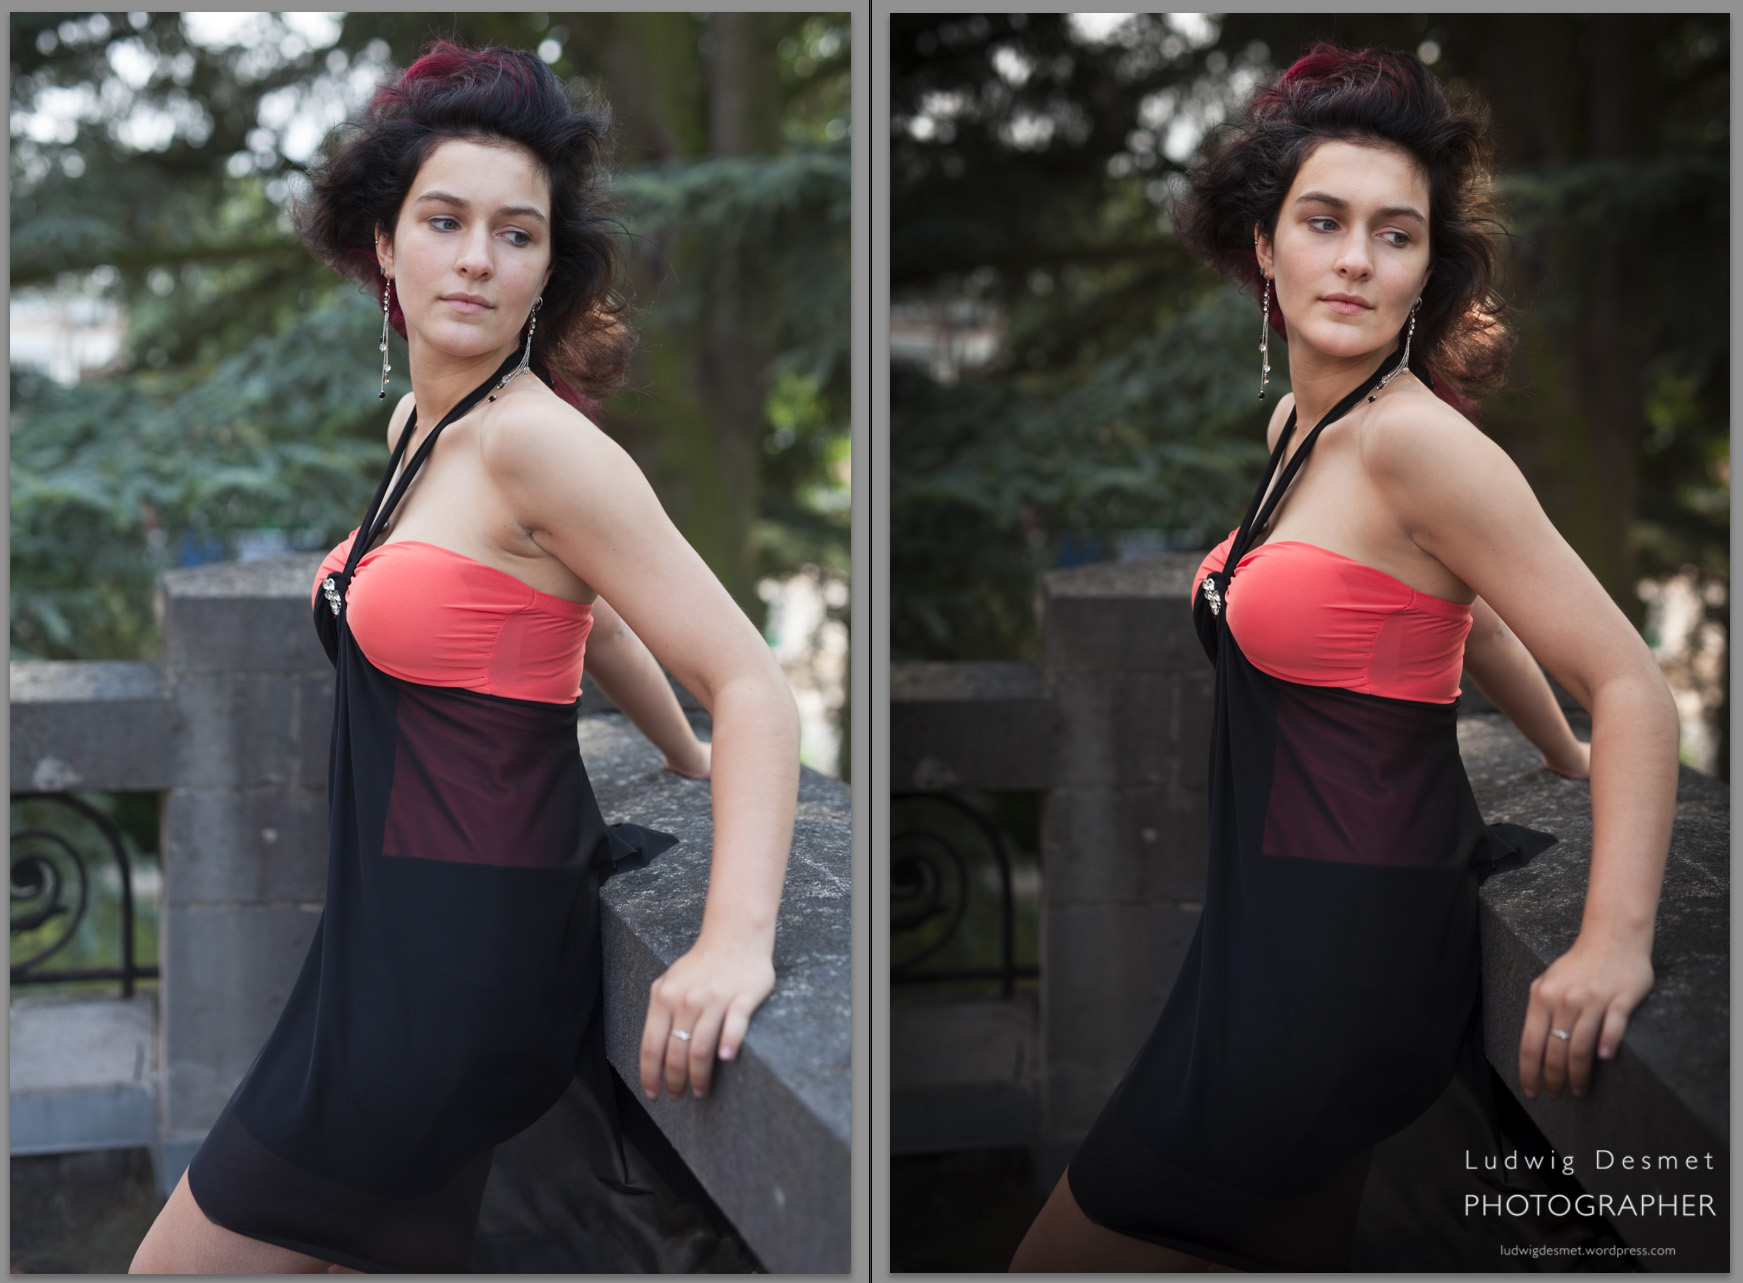
A little evolutive comparison during development. First image is unmodified, straight from camera. First next step is general exposure and white balance corrections, second, the color balance corrections used for uplighting the model and darkening the greens, third is vignette and a graduated filter, to further darken the environment, thus uplighting the model again. Last step is local retouching and further local developing (darkening, lightening, contrast, clarity, …)

I currently use Lightroom 5.5, but I think this development can easily be translated to a Lightroom 4 version.
Now for a step by step analysis:
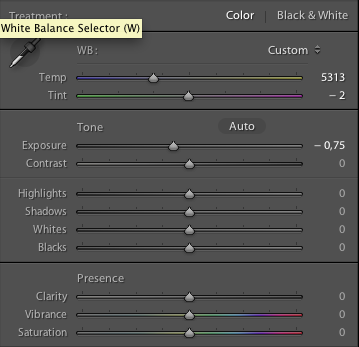
First of all I wanted the overal image to be slightly darker.
This is done with a -0.75 stops correction in exposure. It is always better to lower exposure in post than to have to crank it up. My metering might have been fooled due to the dark dress, the background foliage and dark grey concrete elements in the image, resulting in a slight over exposure. I also corrected white balance, from 4650°K to a slightly warmer 5313° K, no color shift correction needed (-2)
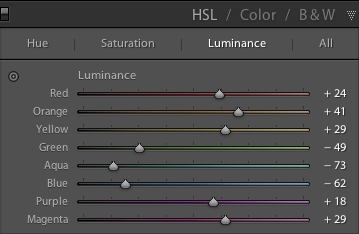
Because my model also darkened with the overall exposure correction, I played with the color luminance sliders to lighten her up again. These sliders allow for color based luminance (or hue or saturation) corrections, without the need for selecting parts of your image.
By getting up the red/orange/yellow sliders, I could bring the exposure level for the skin/dress back towards the original exposure levels from the un-edited image. I do not want to get all the way back, but just want to have my skin tones come back up again slightly. I have a warmer tone in the skin due to the white balance correction from the first step.
Next comes a rather blunt vignette effect, -48, Highlights priority, with the highlight protection set at 51. This gives a strong darkening vignette in the corners, but it keeps the highlights present trough the foliage.
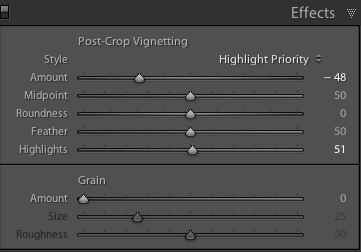
I’ve also added an extra darkening gradient to the left, to further make my model stand out in the image. -0,69 exposure, gradually fading over the centre of the image. Here’s how it has been applied: Running from the left at -0,69, having half the correction on the line with the dot (approx -0,35 stops) to nil at the right line.
next come the local corrections, first I remove some small skin imperfections, actually this model had very smooth skin, so no much work needed here, but I also tried to soften the armpit wrinkles a little. I do so with the spot removal tool. Here I chose to soften gradually with a healing correction in several steps.
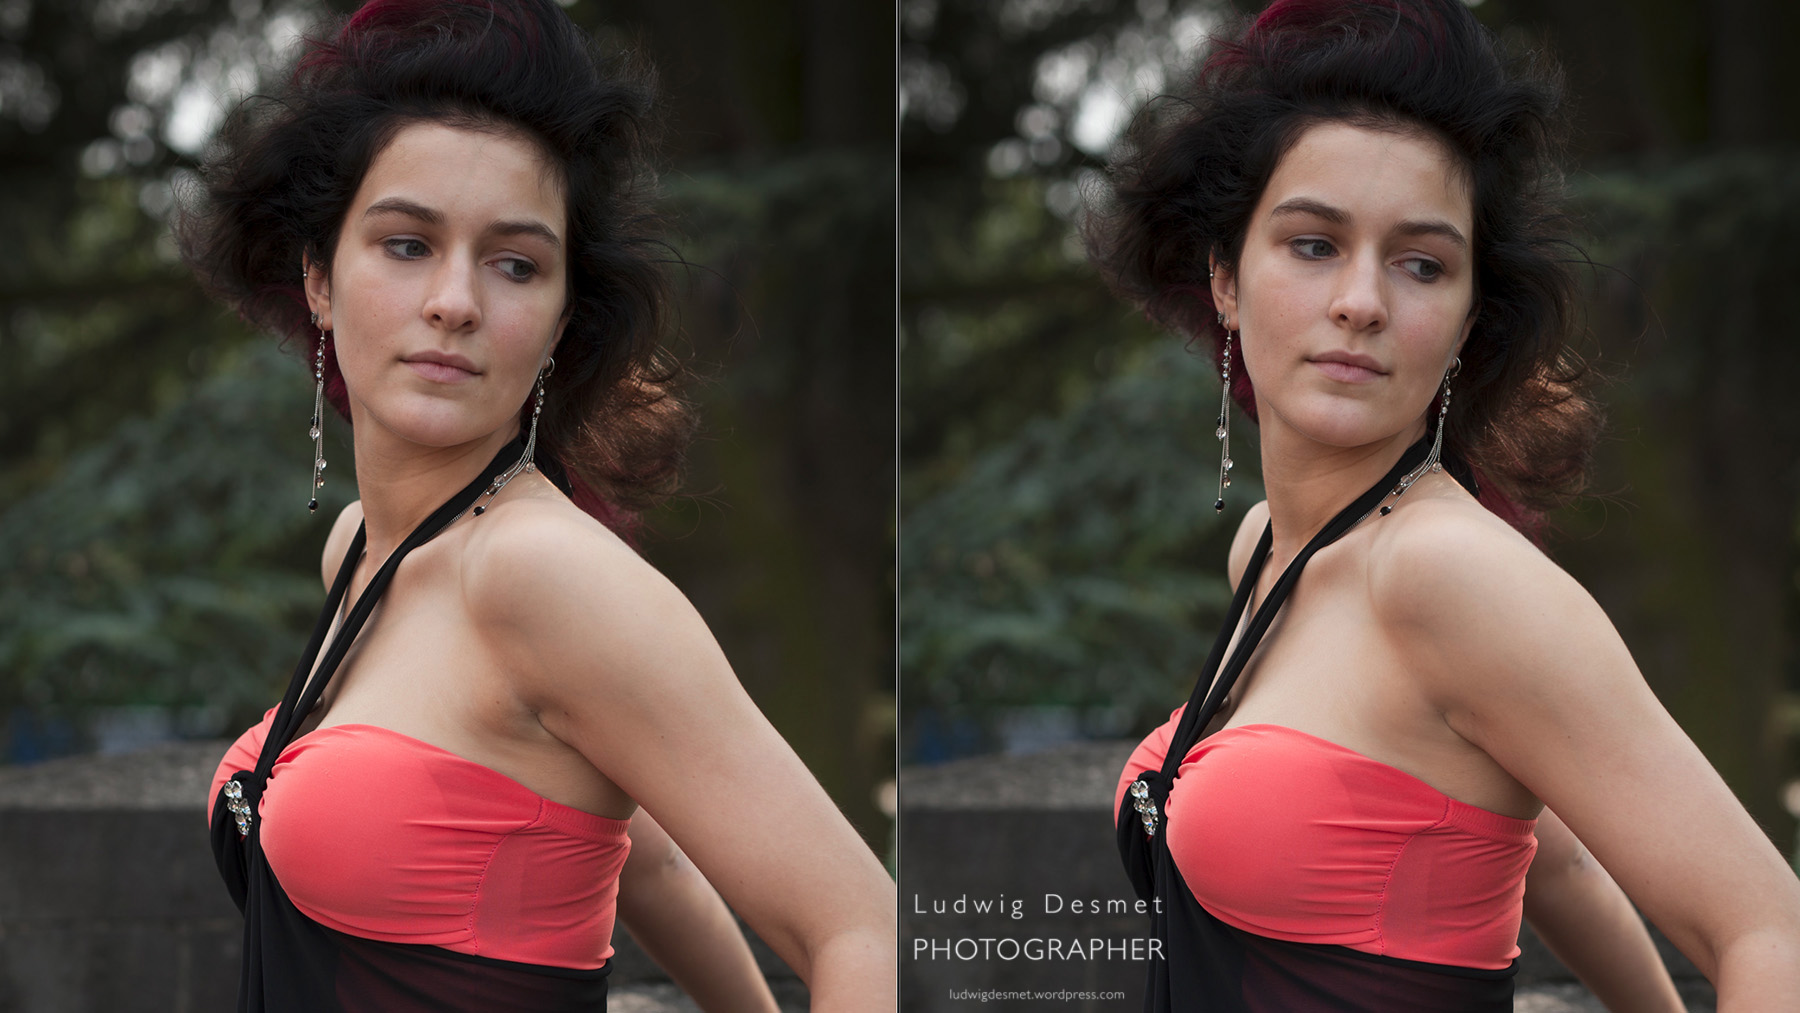
And then for the final touch, I added quite some additional local adjustment brush corrections.
What I did:
Added exposure to the face and hair, eyes (separate brush) and earrings
Added contrast and clarity to the hair and earrings
Added clarity and saturation to the lips
Added highlights, and warmth (local white balance correction) to the sun-lit hairs.
Sculpted a little with make up like techniques (shadows and highlights applied in different facial zones), like darkening the lower cheeks, below the eye brow to the center, just below the chin line, uplighting the upper cheeks, below the eyebrow to the outside, the forehead, chin area, …
I added a little light in the black dress too.

I hope you’ve learnt something, especially interesting if you do work with Adobe Lightroom of course, but also if you would like to do some development in other applications of course.
And by the way, should you be interested, I do give Lightroom classes in Gent, at KISP.
Hope to see you soon, don’t hesitate leaving a comment.
Ludwig
One thought on “Lightroom 5 processing – before and after with Kimberly”
Comments are closed.