Studio Light setup

studio, studio light setup, Tips and Tricks, Uncategorized

a long time ago I made some studio setup diagrams for this blog, … time to make a new one. First the image, it dates from a while ago, last fall I invited two friends to do some studio work. I rarely use my studio equipment for light, but in winter times it can be handy to have an alternative to available light sometimes.

the image:

I wanted Steven to get some sort of gangster look, cool looking, hood, sunglasses …

I wanted a soft light and deep shadows under the hood, so I went for some sort of symmetrical light setup, using two studio flashes with 60x60cm softboxes, and two large reflector panels to even enlarge the light source.

The setup:

it was only a matter of finding the good ‘depth’ position of the model, to create just enough light on the face, and keep the light only on the front.

another one without the hood:


thanks for watching, come again soon,

Ludwig

Photographing sculptures

assignments, Personal Pictures

Hi,

last summer I was asked by a belgian sculptor, to photograph some of her works. She’s working on ceramics and sculpting mainly. you can find her new site here: Sylvia Hens (the site is currently being rebuilt)

She had especially requested to work with existing light, and to try to emphasize on the emotional expression of her works, I was not sure I understood her completely, but she assisted during the shoot, and she was very happy with the results we achieved together.

So all the images are taken with available light, sometimes with the aid of a small reflector. The reflector could even be a simple sheet of white paper.

All exept the first two images were taken inside the lovely house of the artist, with little light. I made very good use of my tripod to prevent camera shake.

I hope you like the images, make sure to check out the website of the artist.

Sylvia hens-1202

Sylvia hens-1305

Sylvia hens-1337

Sylvia hens-1365

Sylvia hens-1413

Sylvia hens-1431

Sylvia hens-1478

see you soon.

Ludwig

A different kind of Pauline.

people, Personal Pictures

You probably remember my posts with Pauline as a model, The Mansion shoot part I, part II and part III.

last Sunday I had another Pauline as a model. A little younger, but evenly charming to work with. In fact she had been also my subject for a free shoot somewhere in April last year. This time her parents asked me for the shoot. We met at the dance-school where Pauline has taken some dance classes.

I had told the mam before, that I’m not that much into children’s photography but she said she preferred it that way. She wanted a natural looking shoot, with no special extra’s.

For the technicians, not so much light in the dancing school, so an off-camera manual flash was used, to bounce some light from the ceiling. I use Cactus 5 trigger sets. All interior images with my trusted Canon 85 mm f1.8, the outside images (with the jacket) with 135 mm f2.0. On some interior images I used the Trigrip reflector in stead of bounced flash.

I’d like to share you these images. They each show a set of different facial expressions made during short communications between me and my model:


charlemagne-art_Pauline-8220 copy charlemagne-art_Pauline-8311 charlemagne-art_Pauline-8317 charlemagne-art_Pauline-8359 charlemagne-art_Pauline-8427


(you can click them to see them a bit bigger)


hope you like them, see you soon!

ludwig desmet alias charlemagne


Marcia studio shoot

people, Personal Pictures, Uncategorized

Marcia volunteered to be my model in this studio shoot.
She is unfamiliar with modeling work, so this was kinda’ new to her. She brought different clothing sets based on a small mood board I sent her to start with. It is a good thing to have a direction to work to. (I claim no credit for these images, this is just a selection of tumblr images.)


This was the narrowed down selection from the mood board, at least what direction we aimed at. Three different things, 1. is a three light setup, 2 is a single light setup (at least we reduced it to a single light setup) and 3 is also a single light setup.

Shots for number 1:
just some shots in the same tonalities as the moodboard shot. Don’t forget to click them for a bigger size!

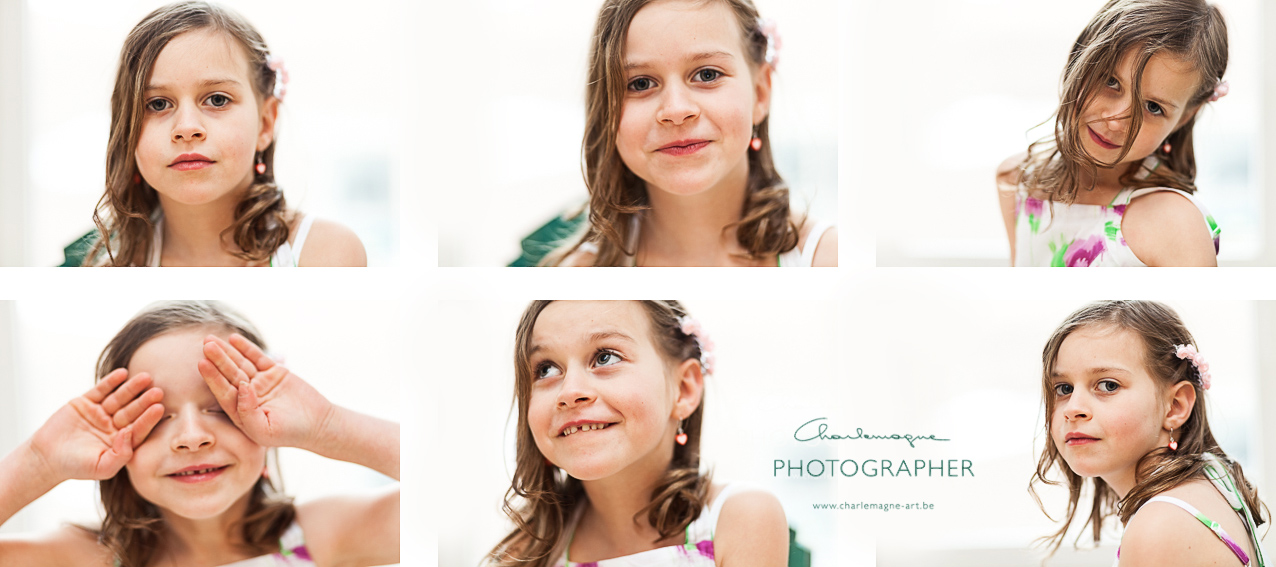
Then Marcia started to feel a bit more comfortable and at ease, and we started doing some expressions, I made her untie her hair etc.

Sometimes I like to add some processing to create a different mood and atmosphere to the image. Just to show you what a quick edit can do:

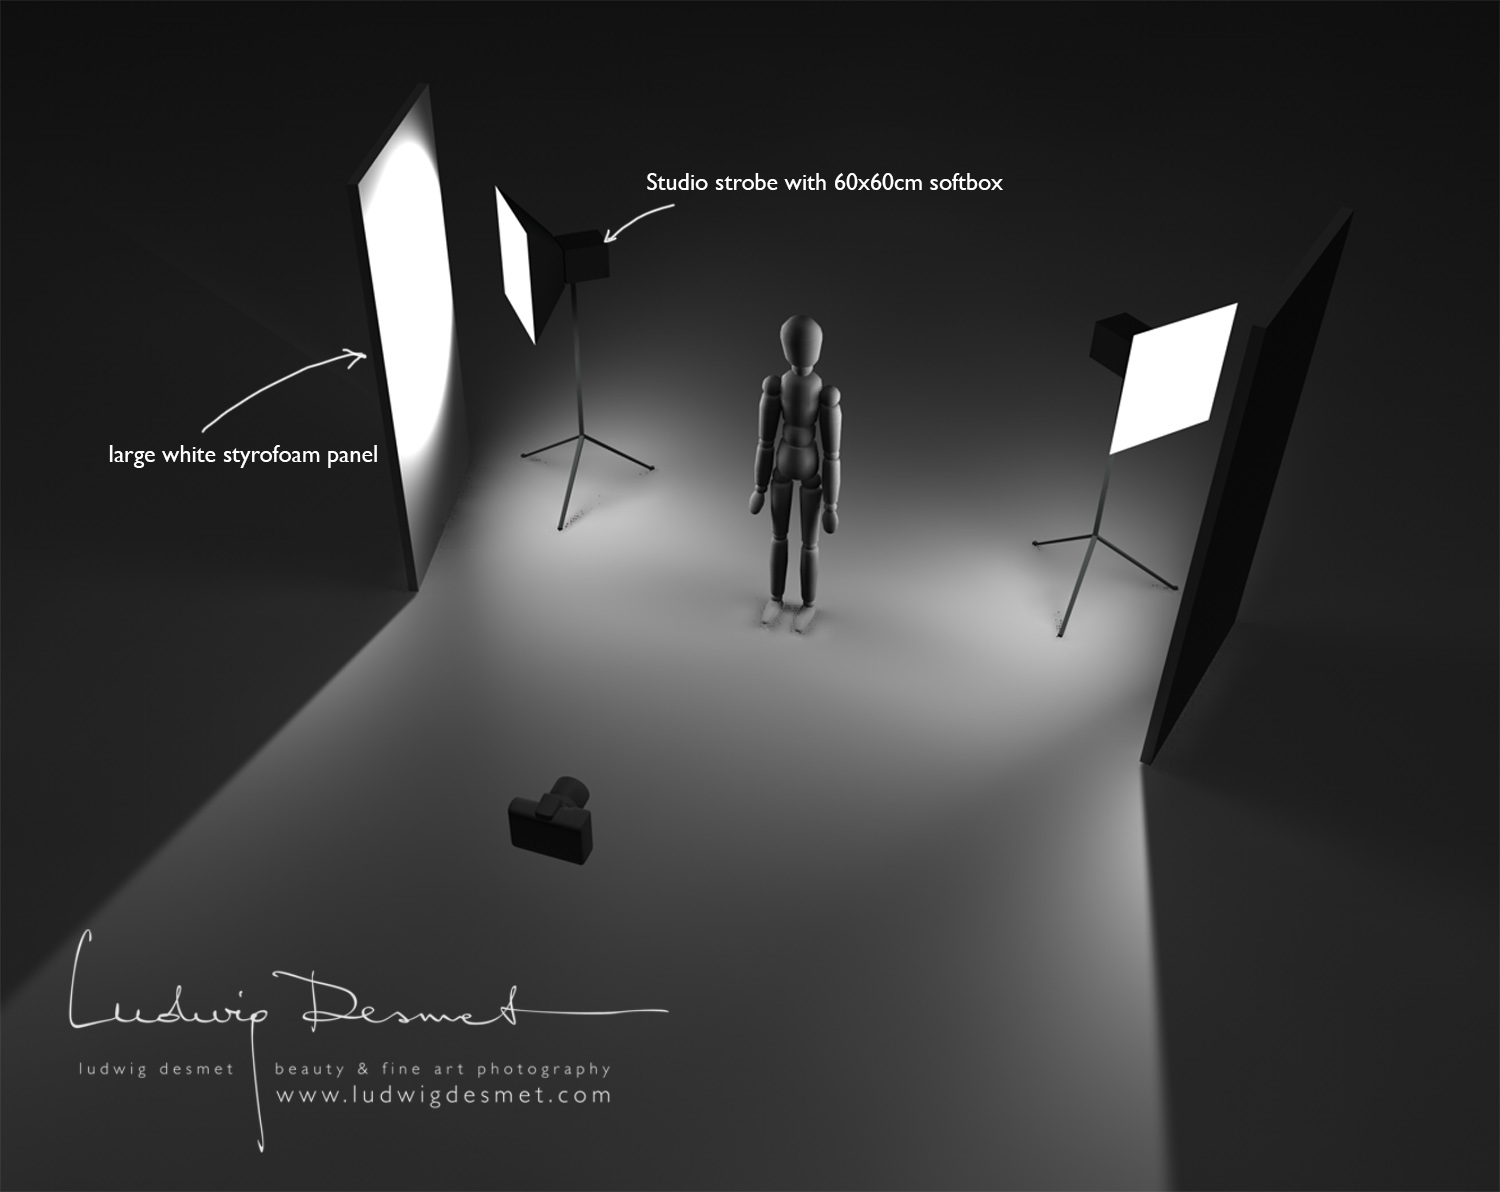
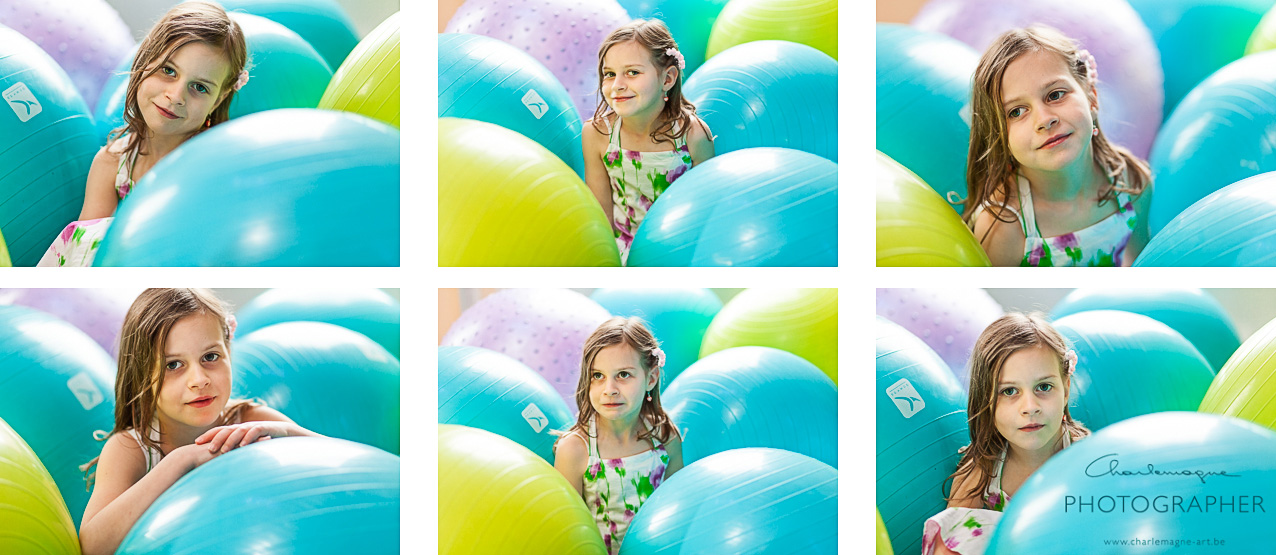
All these images were shot with the same 3-light setup, two umbrella’s left and right behind the subject, pointing a little towards the camera, and a softbox just above Marcia’s head:

Then up to the second mood board image.
I wanted to recreate a window like shadow, with direct sun falling into it.
We have very limited gear in the school studio, so we had to ‘be creative’.
We used four large styrofoam reflector panels to create a window, and barn doors on the flash light. A 5th reflector panel just to the right of Marcia created some fill light at the shadow side. I had my assistant of the day (Gert) to hold a black light blocker next to the flash-head, because we got too much spill light into the studio otherwise.

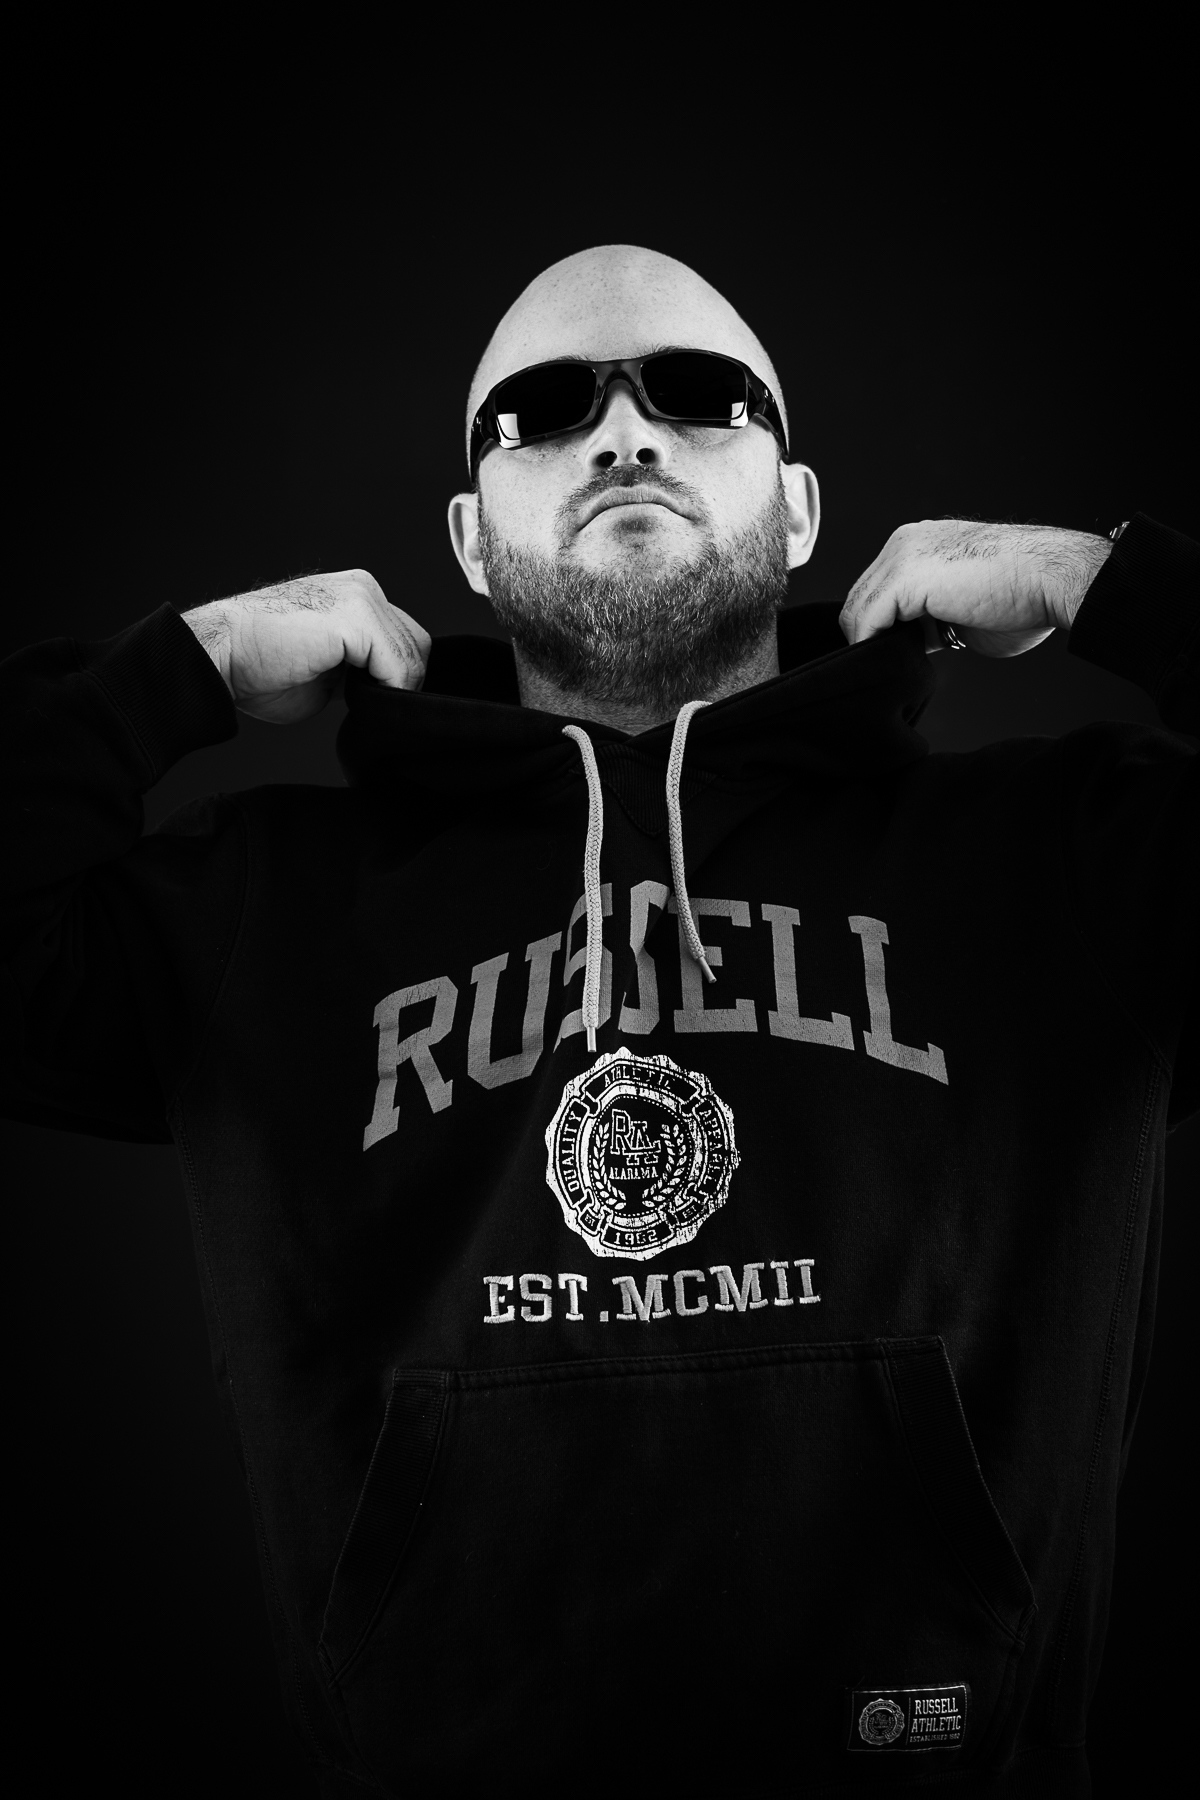
Marcia loves sunglasses, so we used them. (I always please my models, or at least do what I can do to do so 😉 )

And for the results:

And then the number three from the moodboard.
(Actually we did this one second, and the sunglasses last, because we re-used the setup from 1, except without the umbrella flashes, so only the top softbox)
Marcia has too much hair to do something similar to the mood board, so we had to improvise. She did really well, she posed quite easily now, so we could try out different things quite quickly.

At last, don’t be afraid to do some post-processing. This one image I especially liked, and I processed it a bit like the mood board example, and then a second time I processed it to my likings. Look what difference this makes:

What have I learnt from this shoot:
You don’t have to be an experienced model to create great looking images, as long as both model and photographer feel comfortable in each others presence. Thank you Marcia for stepping forward on my request for a volunteer!
There’s a lot that can be done in only a short period of time, at least when you are a little bit prepared as to what are your targets. (mood board) This shoot took one and a half hour, from start of first setup back to a cleaned up studio room. Thanks again to my assistant of the day at Kisp, Gert.
Dare try some post-processing to change the mood of your images.

Next post will be a series of images I took from my wife Nathalie – EMOTIONS

come again soon,
Ludwig

Simple setup for kids shoot

people, Personal Pictures, personal tips & tricks, Tips and Tricks

I did some kids shoots in the previous weeks and I wanted to share this simple setup for nice pictures.

I was asked to do some portraits for a cousin and then with the same setup I took some pictures with our two boys together. Setup is the same and is like this:

I have a simple black cloth as a backdrop, a flashgun EX 580 II with a small softbox on a stand as a main light, a large styrofoam board (220×120 cm) as a reflector panel and a second flashgun (snooted with a self made insulator foam snoot in the back) to provide some rim light.
The results look like this (not the outdoor shot, nothing to do with this setup):

After the ‘brothers’ shoot, we had some fun with a balloon. They threw it up before their heads, and I shot it when it just passed their face. (I admit, we had to repeat this several times) I had some fun in photoshop afterwards.

Hope you liked this post!
Ludwig

Lynn Studio shoot

people, Personal Pictures, photo gear

I wanted to share some pictures with you from my latest school work. Yes, I still follow classes in Photography. I’m currently in the people/portrait class, and the first studio shoot was to be done with one flashlight. We could use whatever modifiers we wanted, and we had to work towards a chosen sample image.

I had chosen this image as my goal for this assignment: I don’t know the photographer of this image, if someone knows, pls. let me know so I can credit the image.

I knew that it was going to be a fairly hard thing to get, this soft light coming from everywhere. I was pretty sure that I needed indirect light, so I chose for two huge reflector panels (Polystyrene boards, 1.20m wide at 2m heigh). I already had left the idea of lighting the background as in my sample image.
I had a perfect model for this picture, Lynn. She is a hairdresser, and specializing for make-up-artist, and she prepared herself the best she could, based on this example picture.
This is my setup:

I have been working with my 85 mm 1.8 in order to be able to just hide behind the reflector. Otherwise I had too much flare from the lightsource.

these are some results with this setup:


After that we tried a second alternative, the softbox, and one reflector to the left of my model. I experimented a bit with different positions for shooting, and different poses.

Result was quite satisfactory, so we decided to do a completely different setup, just for fun.
I wanted a very localized light, and I had no snoot available, so a gridded flash with barndoors did the trick.
I turned these images into BW because they made me think of these movie stars, longing for the hero to come back home.

Second half of the evening, we didn’t have the studio available anymore, so we did some freestyling in the hallway after that, with a reportage flash off-camera, combined with my Tri-Grip silver/white reflector. These are taken with the 135mm f2.

Hope you liked reading, feel free to comment!

In bed with Sue

Interesting Links

Last weekend I got a message on the ‘belgian weddings professionals’ facebook group about a 3 day online streaming course by Sue Bryce. Sue Bryce is what I would call a feminine beauty photographer, specialized in make-over shooting experiences. slightly based on the 80’s glamour, but totally reworked into a contemporary portrait style, with modern posing, make-up, hairdo’s etc. trying to create a unique experience for the women being photographed.
I took some quick glimpses of the course, in-between work, and I decided to immediately buy the course. At 99$ it is worth every penny. I’m only at the end of day one, in my viewing, and I’ve got tons of very useable tips already. Can’t wait to see the rest.

Sue’s website:
www.inbedwithsue.com

the link to the 3-day course: (sorry the price of 99$ was only during the course, now its some more)
www.creativelive.com/courses/glamour-photography-sue-bryce

I immediately used some of her posing tips in my first model shoot this week and I was very pleased with the results:

more professions – light setup

people, Personal Pictures, personal tips & tricks, photo gear, Tips and Tricks

And my project on profession portraits goes on.
I have quite some people spontaneously offering to pose for my series of professions. A classical portrait with a – small/not so small – glimpse of the job they do.
Below, you’ll see the library assistant, the plumber, the health coach and the actuaris. For you to find out who’s who, can’t be too hard I guess. – click on the images to view larger if you have difficulties finding out –

for my fellow photography enthusiasts, I’ll include a more detailed light setup, which is actually very simple:

1. I have a black cloth hanging up in the back of the room 3 to 4 meter behind my subject.
2. I have a reportage flash (Canon 580 EXII) in a 70×70 cm softbox from Lastolite on the right of my subject, which is my only light source. It is set at 1/4 +0.7 power and very close to the subject (maybe half a meter). I put it so close because this allows me to lit only my subject, and have the background almost black, thus reducing the post-processing. it is at the subjects head hight, slightly aiming down.
3. I have my large Lastolite tri-grip on the left side, on the ground + my diy reflector on a small stand, I had to use this extra reflector, because otherwise I don’t get enough light on the shadowside, and I recon my own reflector is just a bit more reflective than the trigrip, which is larger but softer.
4. I’m at about 3,5 meters distance from my subject, at about hip-height, to make my subject seem larger and fiercer, more ‘standing out’ I use my 85 mm 1.8 lens, at f8 on a full frame camera, to get a decent sharpness overall.
5. I have different subjects 🙂 They are all uncomfortable with posing, believe me! I ask them to turn their body slightly towards the main light, looking at me. Then we do about 15-25 shots, until I think we have a good shot, representing both the personality and a good pose.

The images are taken in colour, as raw files, and treated in LR afterwards. I use the standard BW settings, but have some minor local corrections with adding or removing exposure. I then remove the unwanted parts in the image (my background is not large enough for this distance, so I need to remove some ceiling that is not black, sometimes I need to move a small part of the reflector on the left.

I hope you like the pictures, if you are willing to pose for me, please give me a sign trough email or by reacting to this post. In return, you’ll get the chosen image in high resolution, free for personal use.
If you have any questions about the setup, ask it.

shoot Esmée

people, Personal Pictures

About 6 weeks ago I was asked by the mama of Esmée if I could do a shoot with her. We had to re-schedule two times, first because Esmée got ill, second because Esmée fell on her lip and got a big blue bruise. Two weeks ago we managed to get Esmée in good shape for her first photoshoot. My youngest model to date, but one of a kind. We worked together for about two hours, and she loved it, mam and dad too 😀

For light setup I mainly worked with available light and my diy reflector panel and later in the evening a Lastolite 70 cm softbox with my Canon EX580 flash. My two preferred lenses for this kind of work are the 85 mm and the 135 mm, all shots done with these two lenses.

please enjoy a small selection of the afternoon. Click images to view larger version.


If you liked these images, you might consider subscribing to my blog 😀

Model Sharon – herfst

people, Personal Pictures, Uncategorized

In an attempt to get warm after the interior shoot (posing in lingerie in a non-heated building these days is not really cosy and comfortable) we got into the car with the heater on max. and drove to muziekbos, Ronse. There we did these exterior shoots. some different clothing sets, and after a while we got lucky and grabbed some sun-rays. Sharon got cold again at the end. 🙁

first set of three is done with my self made reflector, all the others are available light only. Oh, and the entire shoot was shot with Canon 85 mm 1.8. A very good lens for this purpose, and not really expensive.

Please enjoy this selection. Click to see full size.


Model Mien

people, Personal Pictures

Did a shoot some weeks ago, in the last late summer days of september. We tried some different things, had some fun and returned with some beautiful pictures. Unfortunately the model is very unsure of herself, so she didn’t allow me to publish a lot of pictures. Here a selection. Hope you like them.

On some images you can clearly see the effect of the self made reflector.

ludwig

click images for bigger picture!


DIY reflector

personal tips & tricks, Tips and Tricks

Hi,

everybody will know the difficulties of shooting a model in bright sunlight. Working with the model aimed at the sun will get you peeping eyes, working with the sun in the back will get you dark faces, unless flashed. Most fashion/model shooters use reflector screens to overcome this problem. Model with the sun behind, light reflected towards her/him to light up the model. Most famous make is Sunbounce. A decent reflector will make your purse at least 200 euros lighter, similar size as the one described here.
I’ve made a diy reflector last week. Cost to me: 0 Euros, because all re-used materials. Cost if materials bought new, probably below 10 euros. Time to make it: 15 minutes.
1. Take a insulating board, styrodur, (polystyrene) or similar, in a handy size. Mine is 60 cm x 125 cm. (approx 25 x 50 Inch) Make sure it is rigid, not styrofoam, since this will more prone to breaking.
2. Use some dots of silicone/adhesive, spread all over the board, slightly more concentrated on the edges to ensure a good fix. Rather use dots than lines
3. Cut a length of radiator reflector foil (the kind of foil you fix behind a radiator, to prevent the heat from entering the wall in stead of heating your room) , slightly longer than your insulating board.
4. Spread it nicely over the insulator board, reflecting side outwards 😉 . Press gently all over the surface, to make sure the silicone or similar gets well spread.
5. Trim the edges of the reflector foil to match the size of your board. Let stiffen the silicone.
6. Done.

I’ve been using it in my last shoot, works very well. Can’t compare to the real thing however because I don’t have one, but I saw my model peeping eyes when I came too close with it.